
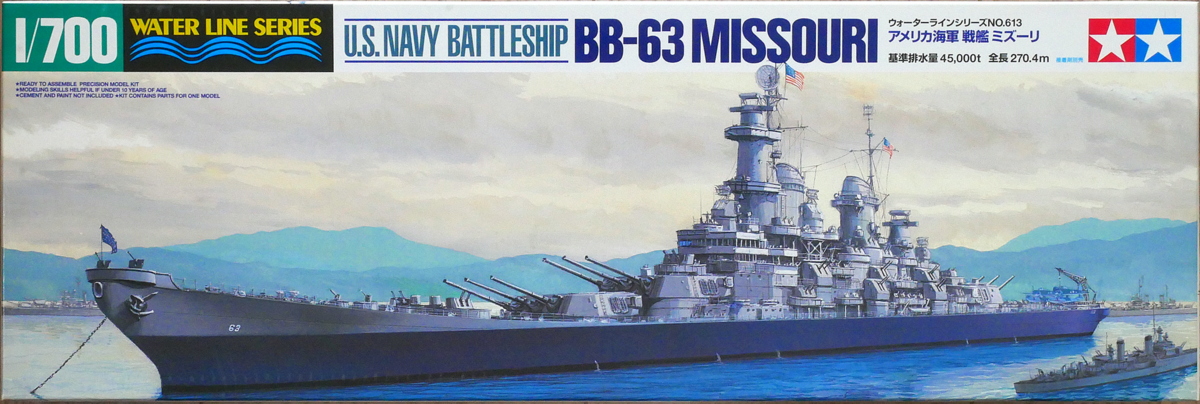
This is my first time making a plastic warship model other than the Japanese one. This is the U.S. Navy battleship Missouri of Tamiya. To be precise, when I was in elementary school, I remember making the aircraft carrier Enterprise with brush paint about 40 years ago, the result was only painted with a brush, so I remember it was not at all. I don’t even remember the scale. This is the first time that a foreign warship has been taken seriously.

Is the bottom black? There were two pieces of ballast. First, I’m worried about fitting the parts in the future because I will stick both sides of the ship together.
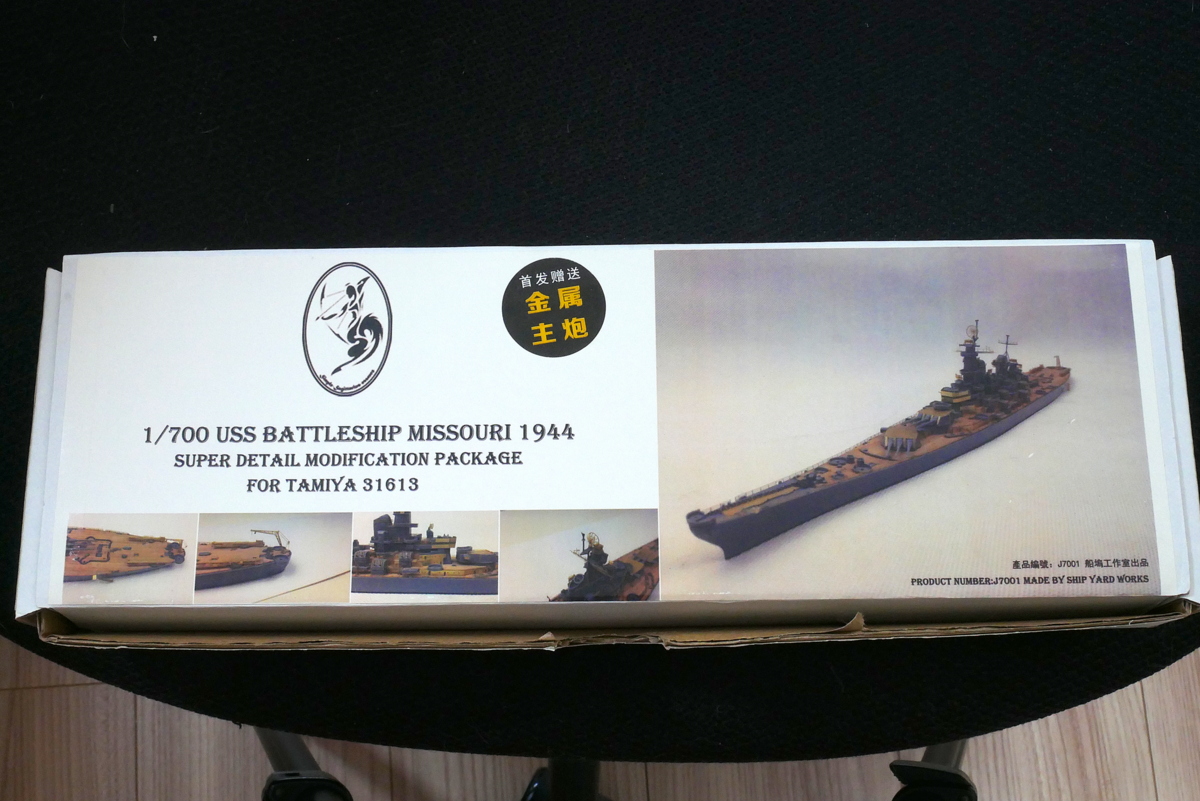
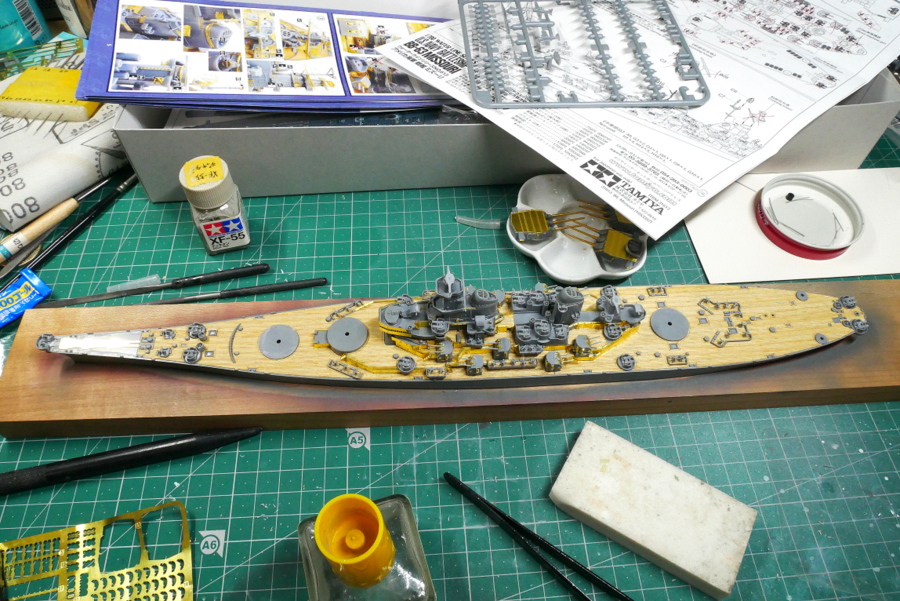
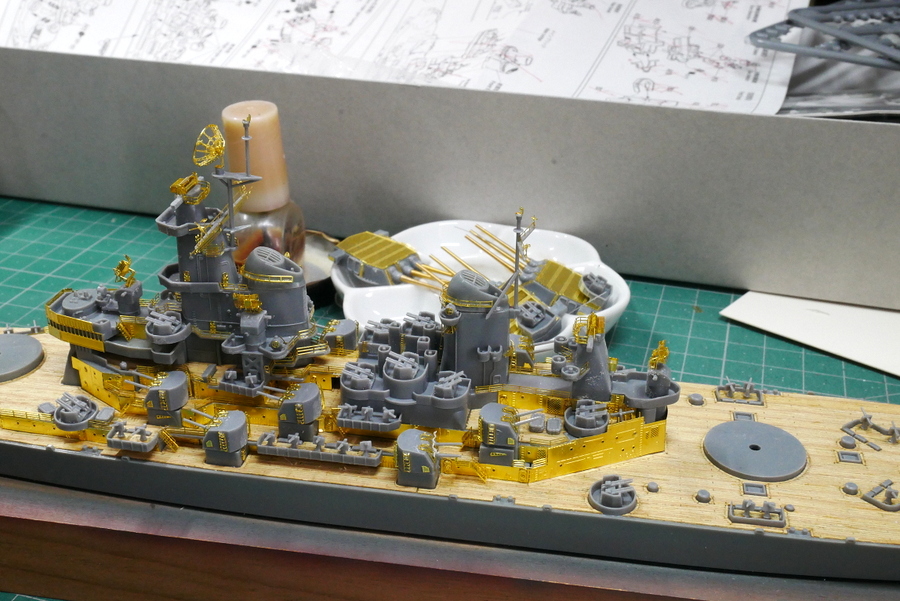
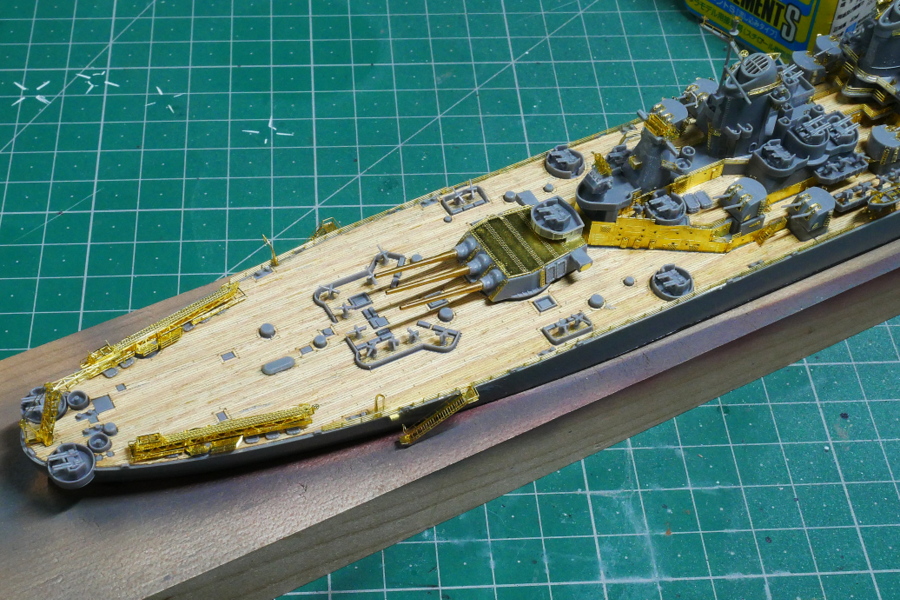
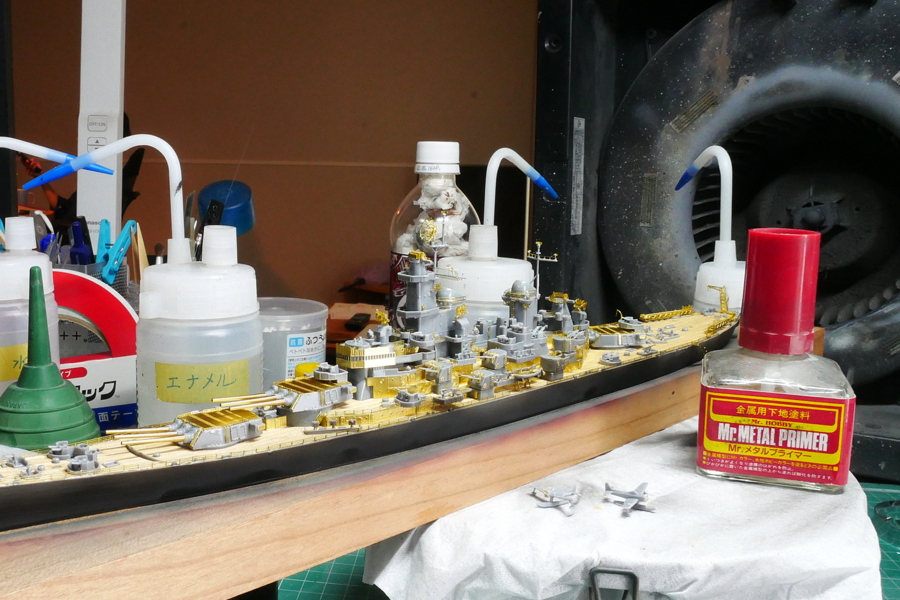
This time, there are various luxurious sets of Ship Yard Works such as deck seal, etched parts, masking sheet, and brass main gun barrel, so I would like to use them.
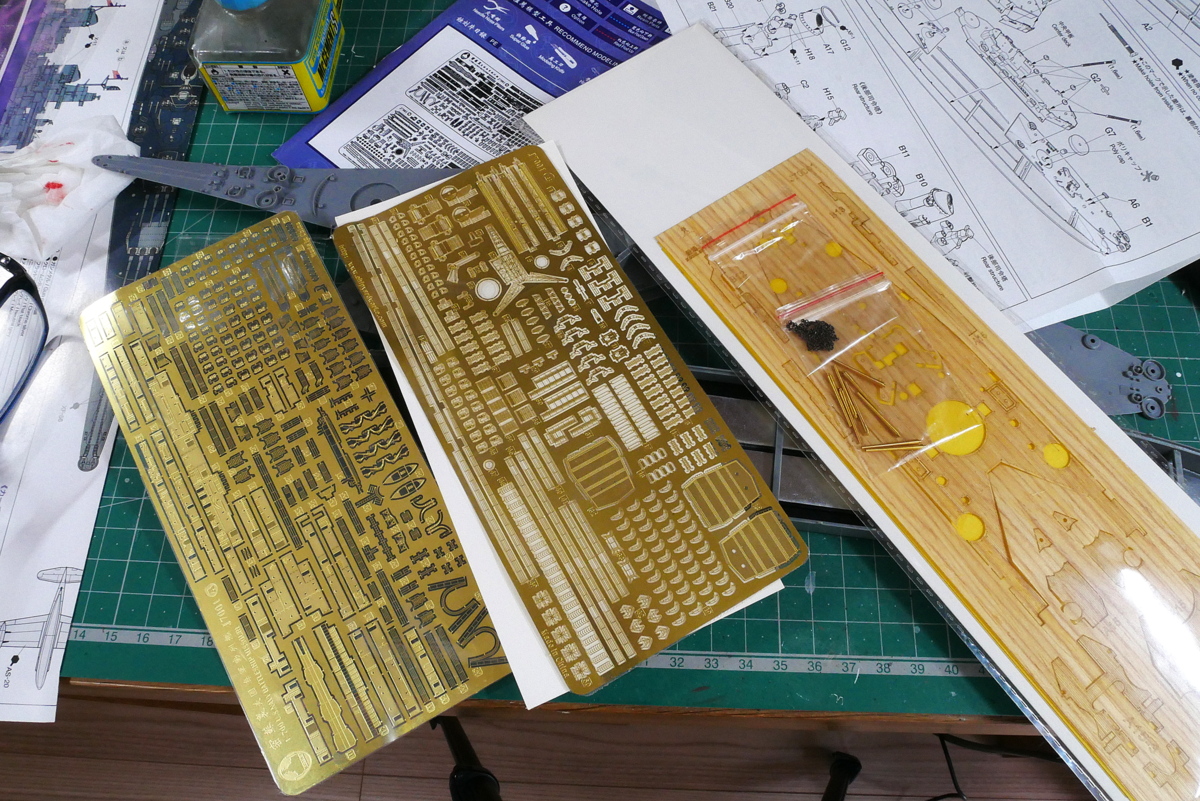 The etched parts are delicate, and there are many, but I will try to use them as much as possible. The etched material seems soft and easy to work with.
(2022/04/12)

A quick look at the description of the etched parts showed that there were not many original parts to be scraped. If I add the etched parts, the impression is that even though there are many parts, the work is not so difficult. It was suddenly difficult to scrape off ten ladders from the left and right sides of the structure near the central bridge.

I bought etched parts and deck seals eagerly, but the deck of the battleship Missouri looked like a deep blue. I liked the finish of the deck seal, which used wood grain, so I was a little disappointed. But will the deck seal mold work even if it is colored? There seems to be some mold in the Tamiya parts, so you might not need to use it. But I think this deck seal is finer than plastic mold.
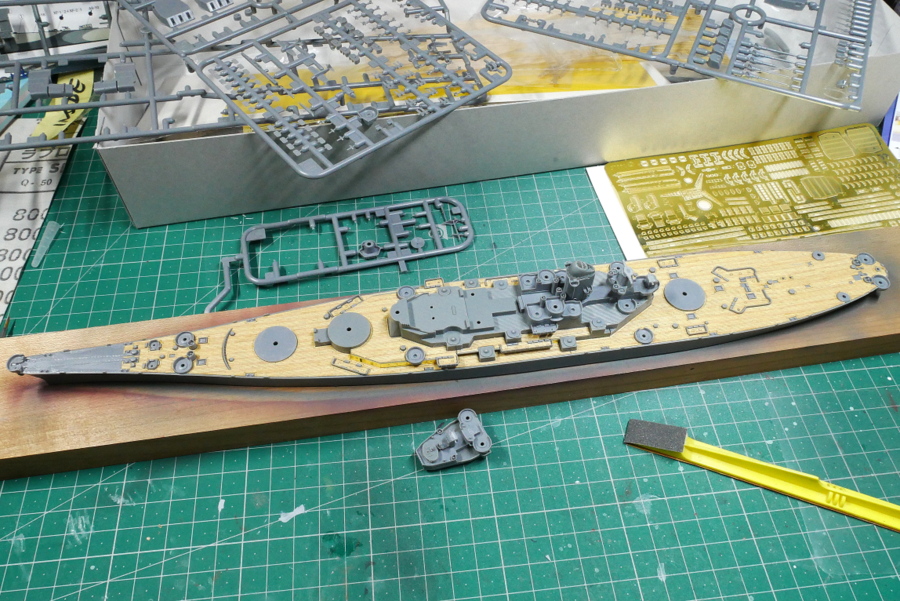
The wooden deck sticker does not use the wood grain because it is painted, so it is better to assemble more and more. As a big problem, I can’t think of the order of painting the large three-color camouflage 32/22D paint.
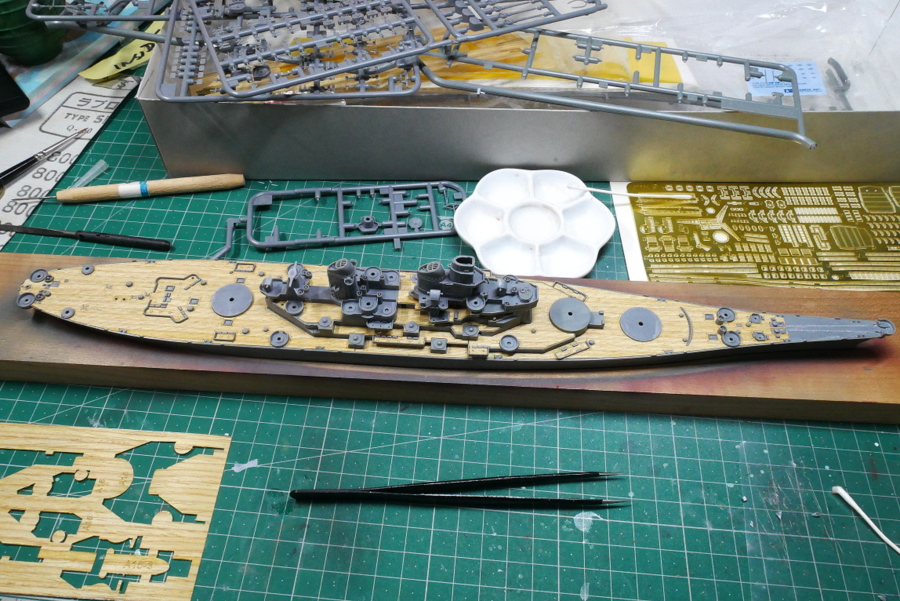
Deck stickers are prepared very finely. To increase the stickiness as much as possible. There was also something like a small piece. I use aqueous acrylic liquid to wipe the deck to remove oil stains and dry it, just in case.
(2022/04/14)
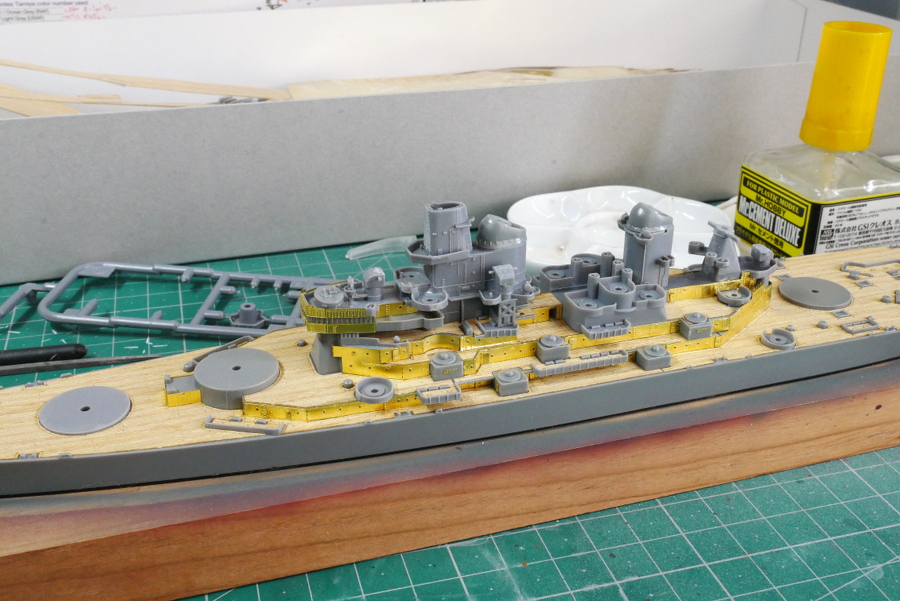
Even if it is a large etched part, I can’t see the end unless I continue to adhere to it without hesitation. The model’s appearance changes rapidly so that we can keep motivated. If I fail, I have to work on the next part without losing my mind. However, the parts are pretty precise, so it feels good. But it takes a lot of time, so I need to proceed steadily.
The exterior of the bridge structure looks like a complete renovation. There are many etched parts to attach to the outside and countless additional hatches to glue after attaching them. It sounds like the renovation of a house. It’s a lot of work, but if the kit is left as it is, it’s too plain so that it might be just right. It gives a feeling of doing it.

About 2 ~ 3 pieces would be fine, but making ten turrets of secondary guns and many etched parts would take a lot of work. Looking at it this way, only Tamiya’s kit can quickly be finished.
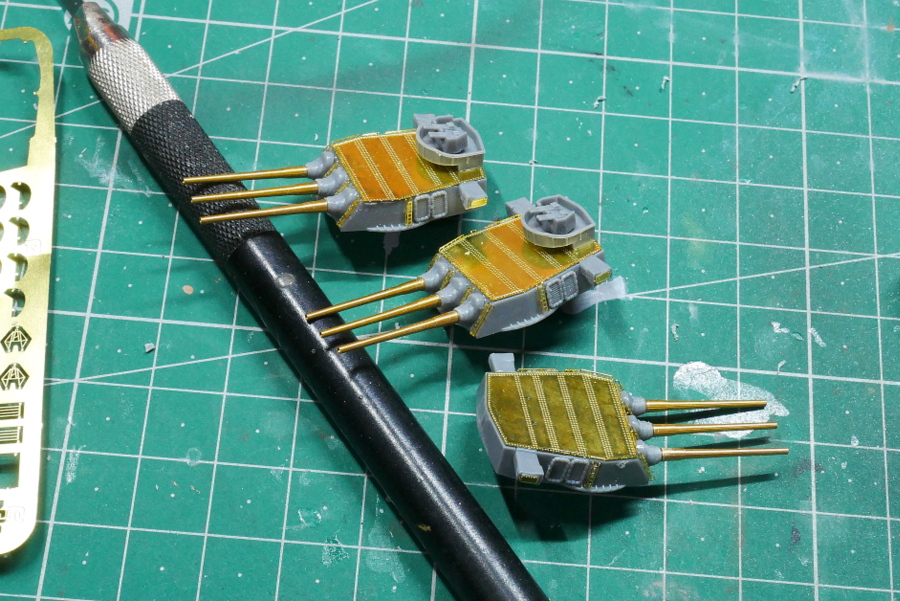
There are many etched parts for the main gun and the turret, and the gun barrel is made of brass, so it seems to have been modified. The plastic parts are cut off at the root, a hole is drilled, and brass parts are inserted and bonded.
(2022/04/19)
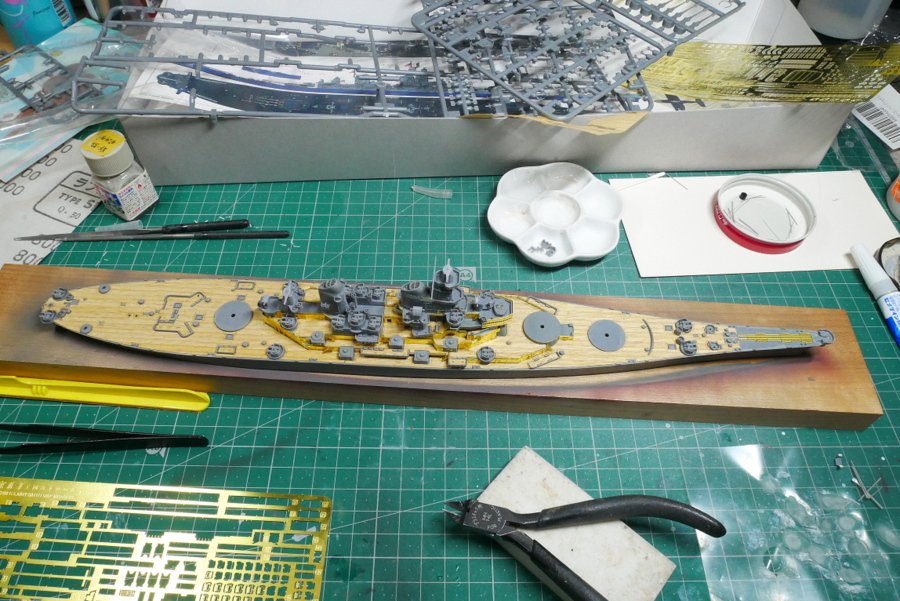
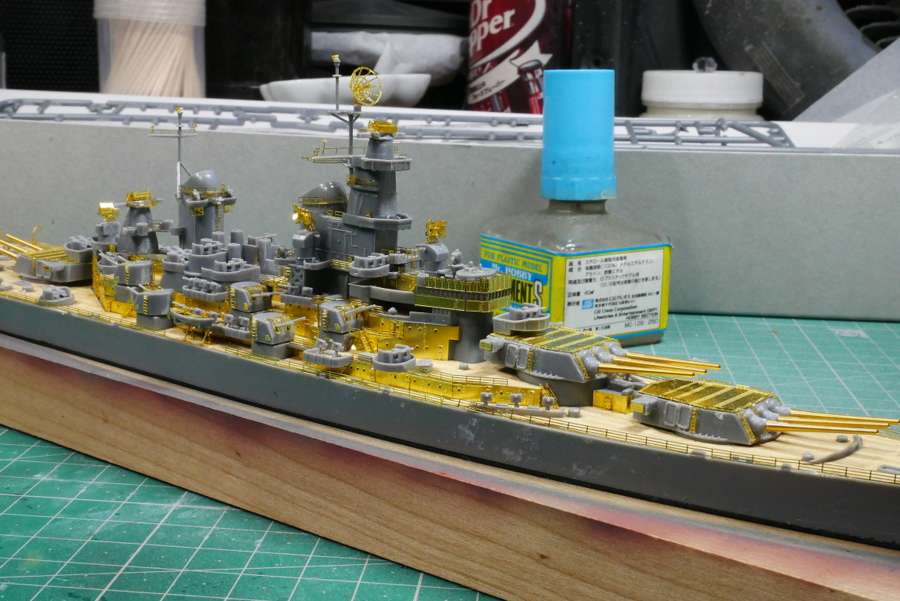
Countless secondary guns, dual anti-aircraft guns, and single anti-aircraft guns are placed on the deck, so they are installed.

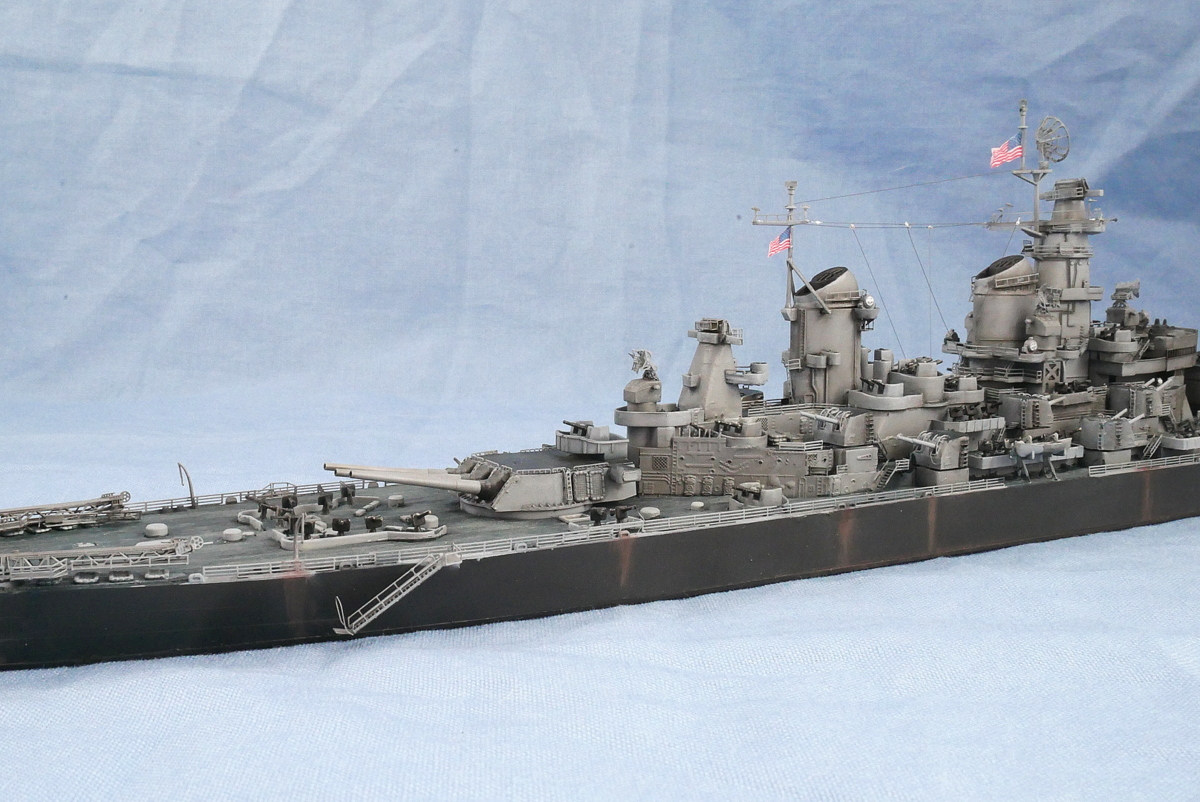
I am making a catapult for a reconnaissance plane. It isn’t easy because there are many parts, and it is easy to break. It is more delicate than the Fujimi etched parts that I have made several times in the past.
(2022/04/22)
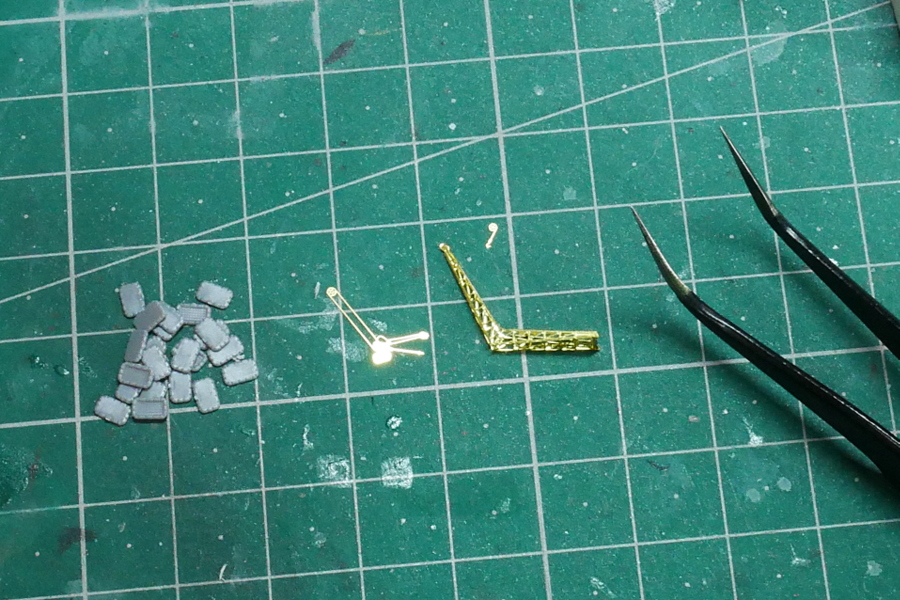
This is a crane installed at the stern. This is also a little complicated. If we have dealt with a few etched parts in the past, we can understand it.
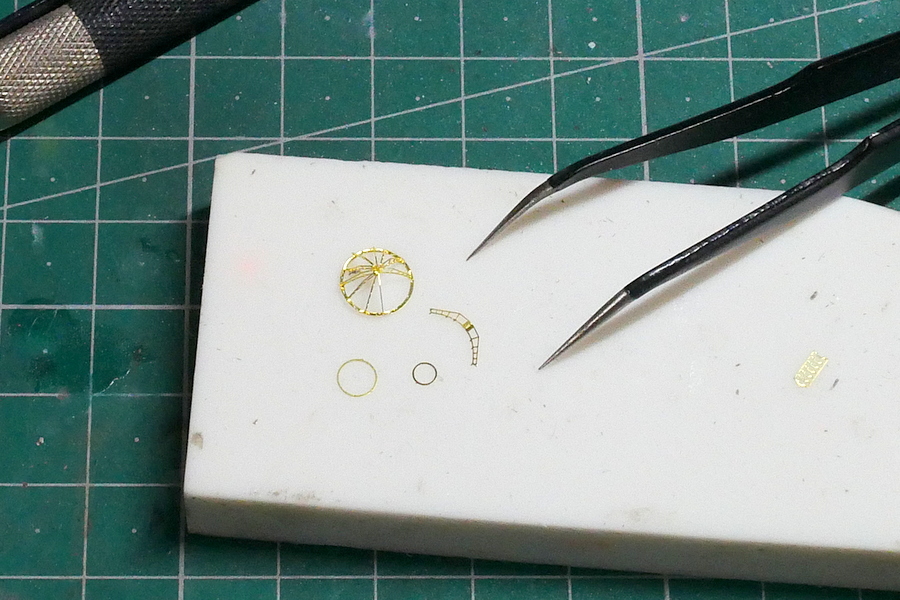
The radar is shaped like a wok, composed of many parts, and it isn’t easy to assemble because I don’t understand it well, even after reading the instructions. I hope the shape will be more or less like that. If this part is put together well, I think it will be a good accent for the whole battleship model.
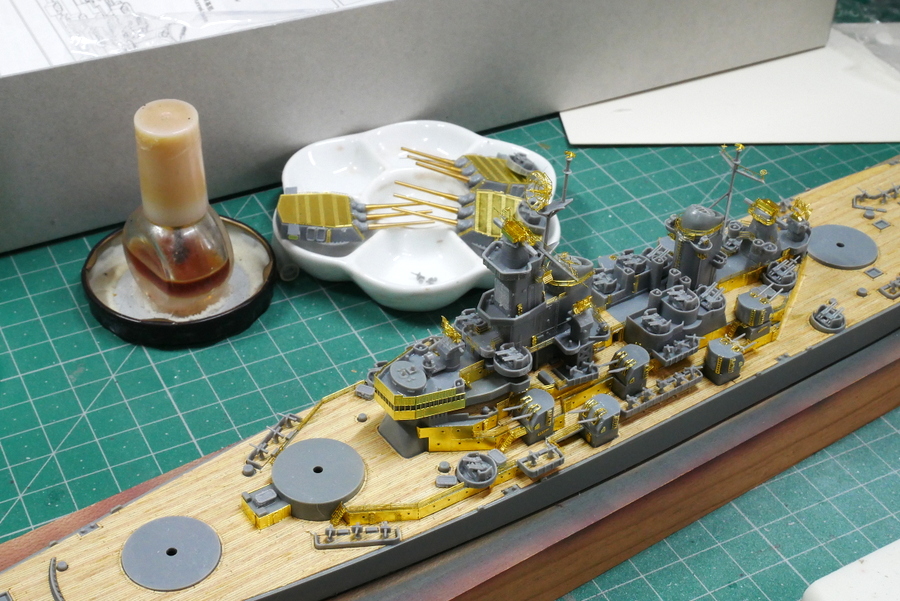
It’s hard to see because the bridge’s parts overlap with the main gun behind. Many etched parts were difficult to assemble, whether it was an anti-aircraft radar or a fire control device, but I managed to stick them together. I think this is enough precision.
(2022/04/24)

Catapults and cranes installed on the stern were also glued. I used a lot of instant glue around here.
Now that I’ve put it all together, I can’t touch many parts easily anymore. I have to make my cat not interested. It is not allowed to carry objects or move objects over the warship. Be prepared for cat attacks. In case of an accident, there is a high probability that it will be damaged…

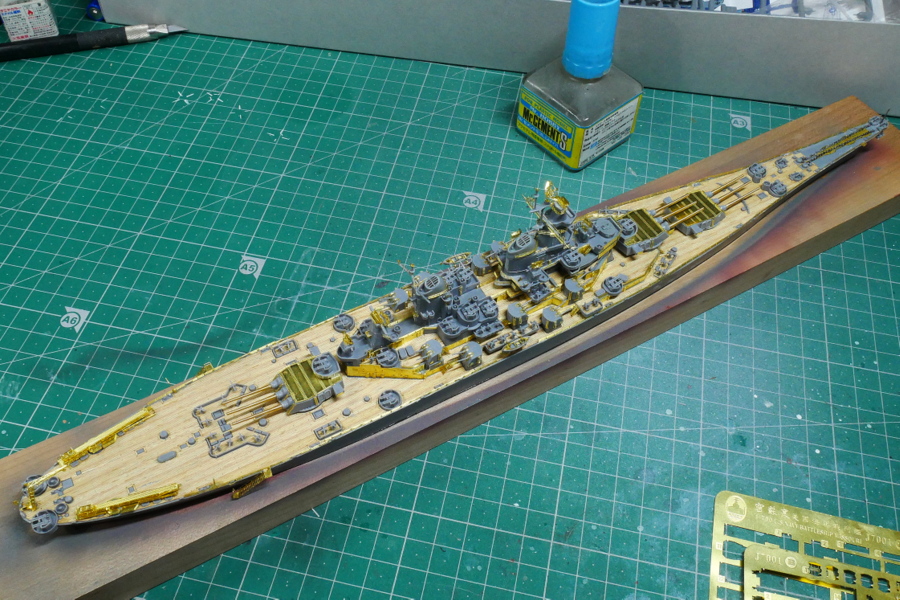
Also, there was the installation of anchorage chains and handrails and the assembly of carrier-based aircraft. There is still a lot of work to be done, but it feels like it’s almost done. Come to think of it, I left a 38(t) tank unattended on the way, so I guess I should start with that.
(2022/04/29)
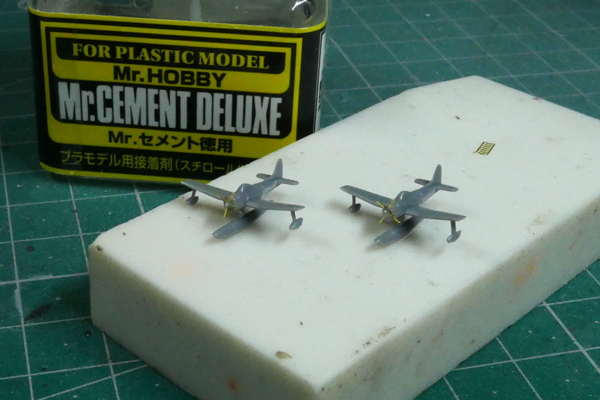
Propeller parts for the carrier-based aircraft were not included in the Tamiya kit or the separately sold etched parts. I thought there was no choice because it was a 1/700 scale, but at first, I tried making it with shredded plastic sheets. It was too big and not so good. After all, I glued four fragile brass wires to each one. It has four propellers. It was disappointing that the shape could not be reproduced in detail.
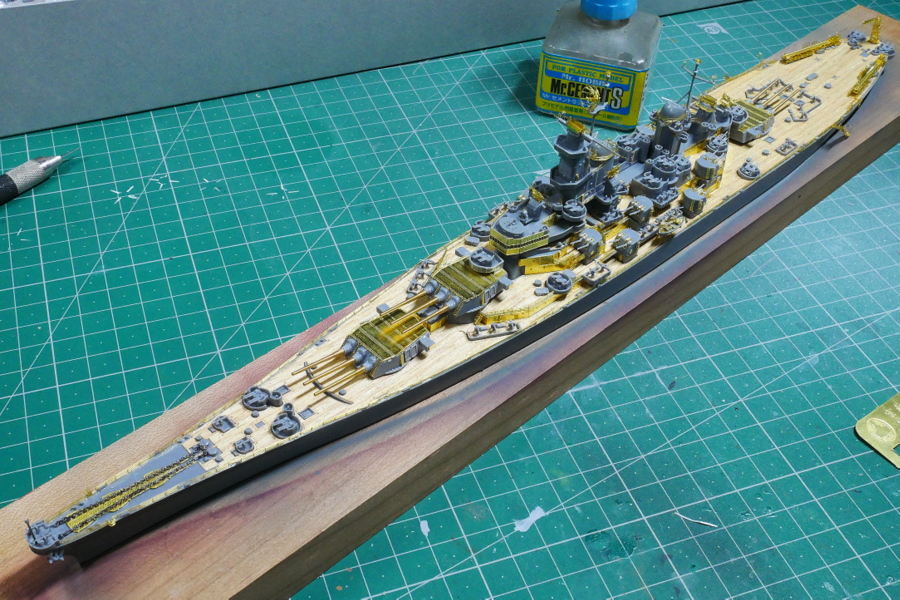
It’s been a long time since I started to make it, but the deck sticker hasn’t peeled up. I think one of the reasons is using instant glue to fix it in various places.
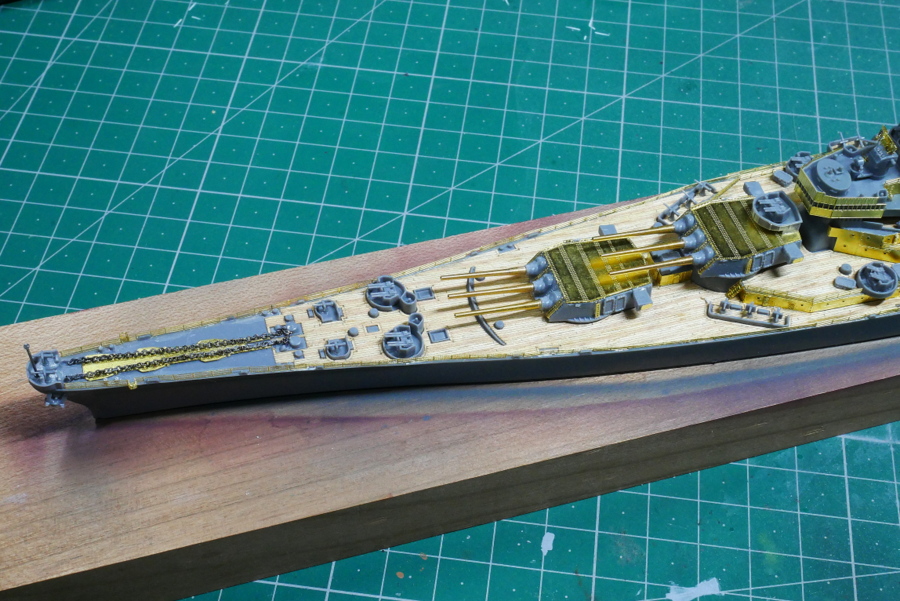 The anchorage chain may be a little over-scale, but I used the one included in the Ship Yard Works modification kit.
How about painting the stern while masking it because it is pretty complicated and structured? That doesn’t sound easy.

A commemorative photo was taken from the bow before painting. I changed the pole of the bow to metal wire because it seems weak to attach the antenna if it is plastic. 0.3 mm still seems soft, so I used a 0.5 mm one though it may be a little thick.
In some places is challenging to install ladders after adhering handrails, so I have to consider the order of adhering parts to some extent. If I think about it, it may not be possible to glue a shipboard structure to a hull and then glue a finely etched part. In the past, when the battleship Yamashiro was built, The etched parts were glued together to make the bridge, and later they were glued to the fuselage.

I realized that the assembly was about to be completed. Still, the Tamiya assembly manual said that the secondary and anti-aircraft guns were facing forward or backward, so I glued them together without overthinking. It’s cool and normal to be on the side. But if there is an enemy in front, all the cannons may face forward, so this is OK. Since it is completely bonded, it is hazardous to change the direction since it has finely etched parts.
It may be the wrong way to build a ship model, but I put it together. It is because the deck seal is also supposed to be painted.
 The assembly is now complete. I think I will put up an antenna after painting. But I worked hard to build many etched parts. I can finish without painting. However, I think it will be painted properly.
(2022/05/03)
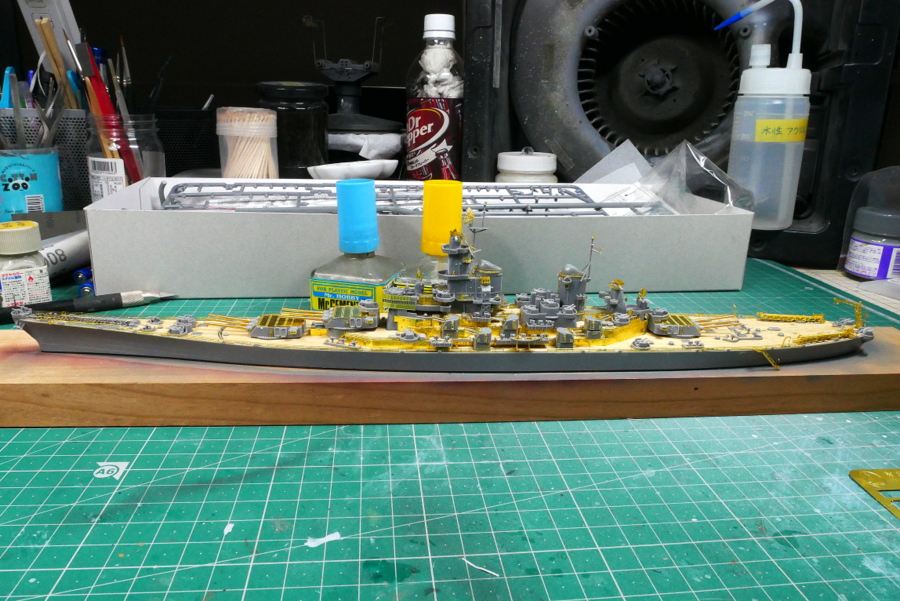
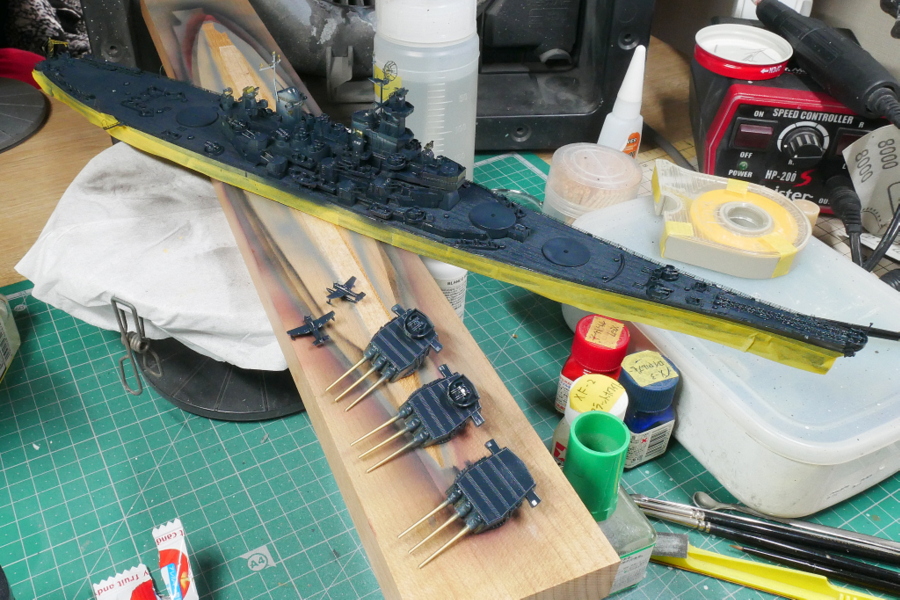
After the metal primer was painted, the ship’s bottom color, flat black, was painted. Metal primer is hard to do with brush painting, so I sprayed it all with the airbrush.
 After that, I painted the broadside midnight blue and masked it. So far, it has been troublesome but not so difficult.
From the deck color to the painting, or instead, almost all the parts visible from above are dark blue. In Tamiya’s manual, there was an instruction to mix various colors. I painted it with Cleos Gloss Sea Blue. And also the camouflage color of the carrier-based aircraft. I think I can adjust the gloss later. The masking process was troublesome, and the work stopped there.
(2022/05/19)
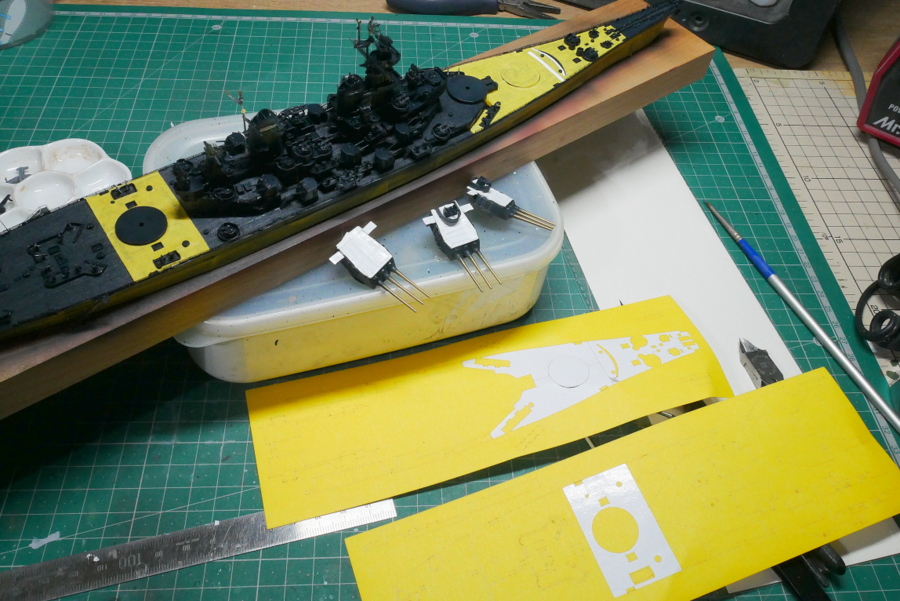
Since there is a masking sheet for the wooden deck, I think I will do the basic painting of the battleship body after masking the deck first. It is hoped that the details will be brushed and carried out with as little effort as possible.

This is terrible. I sprayed the color of a U.S. Navy warship with an airbrush. I thought it was pretty simple, but the color is different when you look at it from above and from the side. It’s different in complexity from painting the top and bottom of an airplane.

I was thinking of masking it roughly and painting small areas with brushing. I thought it would be easy to wipe off the dark blue deck color with an enamel thinner if I used a Tamiya enamel sea blue brush paint. But the sea blue of Tamiya was a little greenish, and the more I painted it, the more uneven it was. It’s hard to paint, and thinning it with thinner won’t cover it up, and it takes a lot of work to paint over small areas, making it look uneven. Ultimately, it was better to paint with a brush using a retarder with Creos paint. I don’t want to paint with lacquer because it has a strong, thinner smell.
(2022/05/26)
According to Tamiya’s manual, “Missouri was given a camouflage paint called Major 32/22D from June 1944, when it was commissioned, until the end of the year during familiarization exercises. The complex pattern is intended to misidentify the ship’s length and shadow.” it says. At first, I thought of painting this camouflage, but at the end of the process, depending on whether I chose the Vaught OS2U Kingfisher or the Curtiss SC-1 Seahawk, the different types of warship paint will be used. Since I am not confident about the detailed camouflage painting, I chose the 1945 Major 22 Camouflage. In this case, the sides and top colors are different, but there is no diagonal camouflage paint. Even so, it was pretty hard to paint.
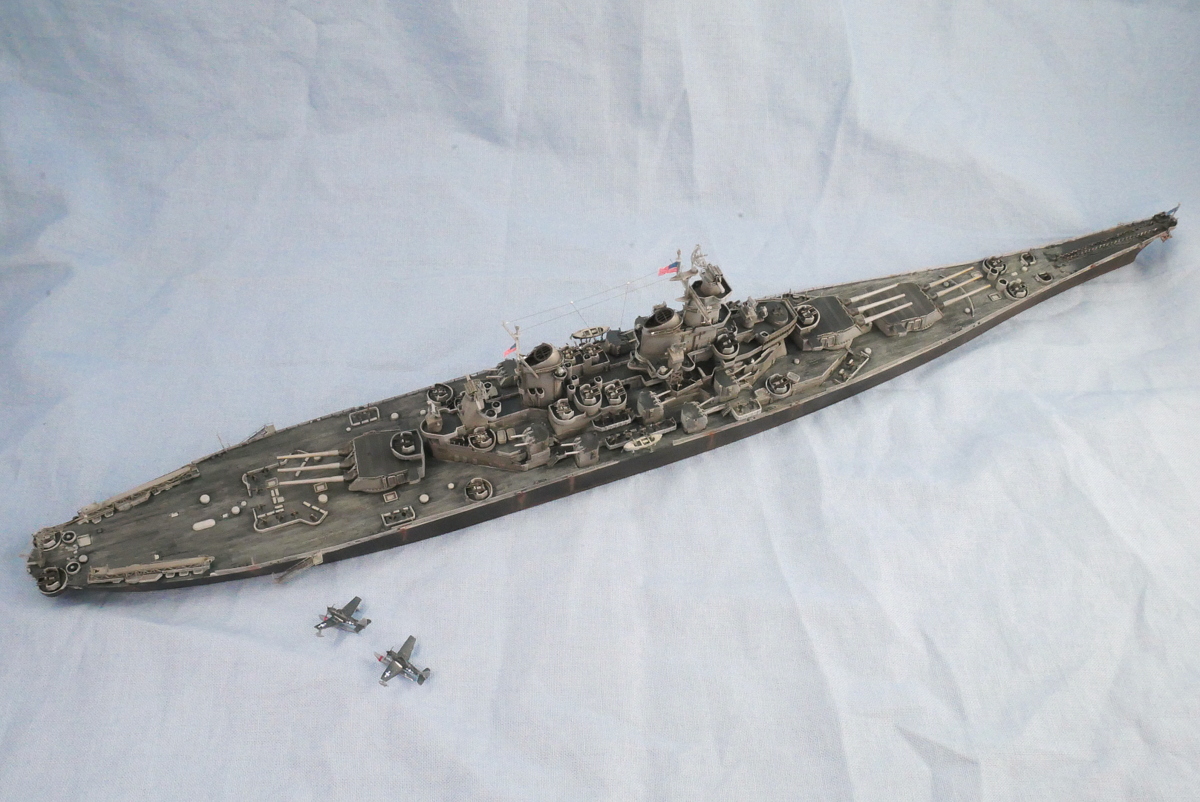
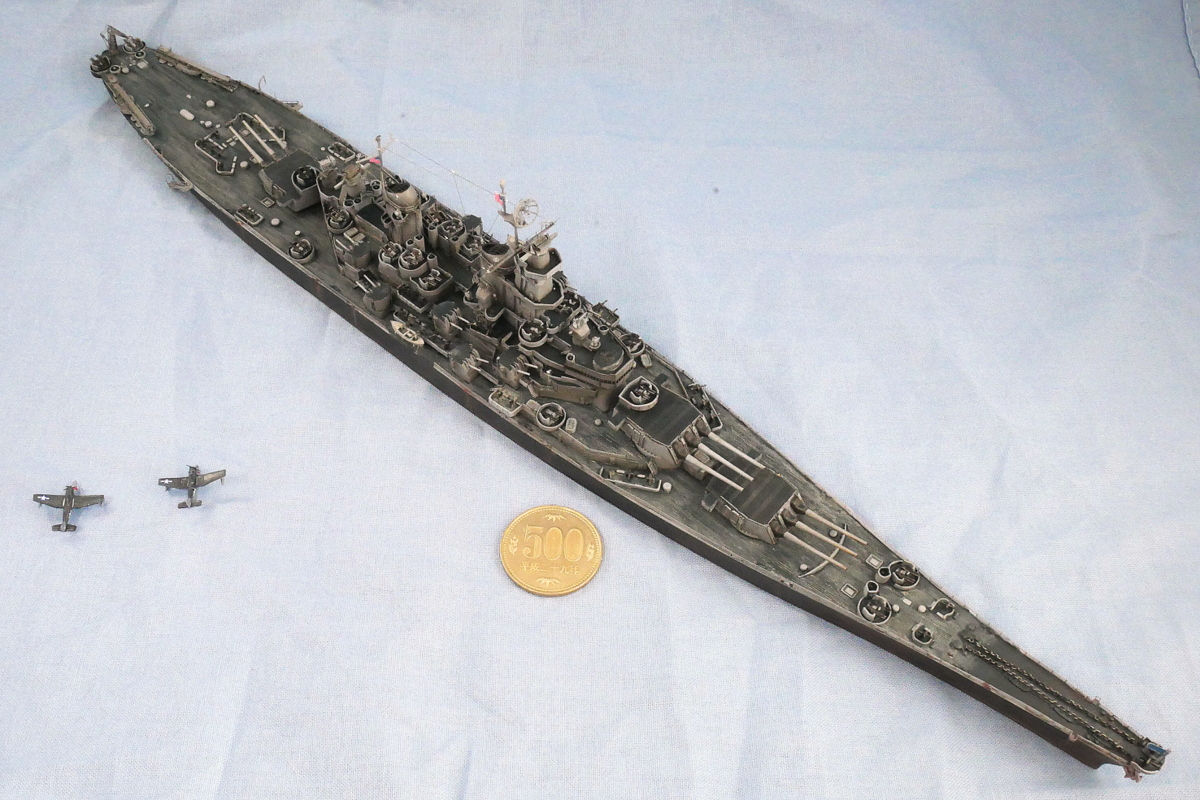
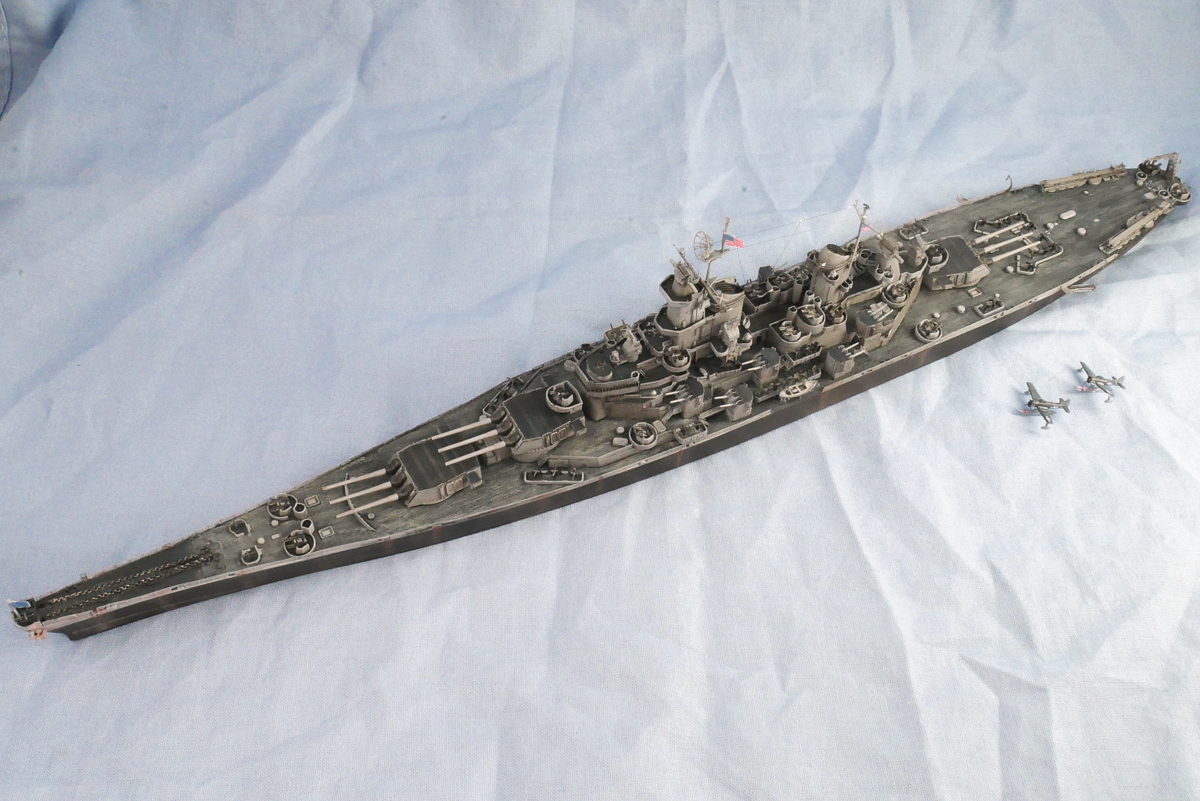
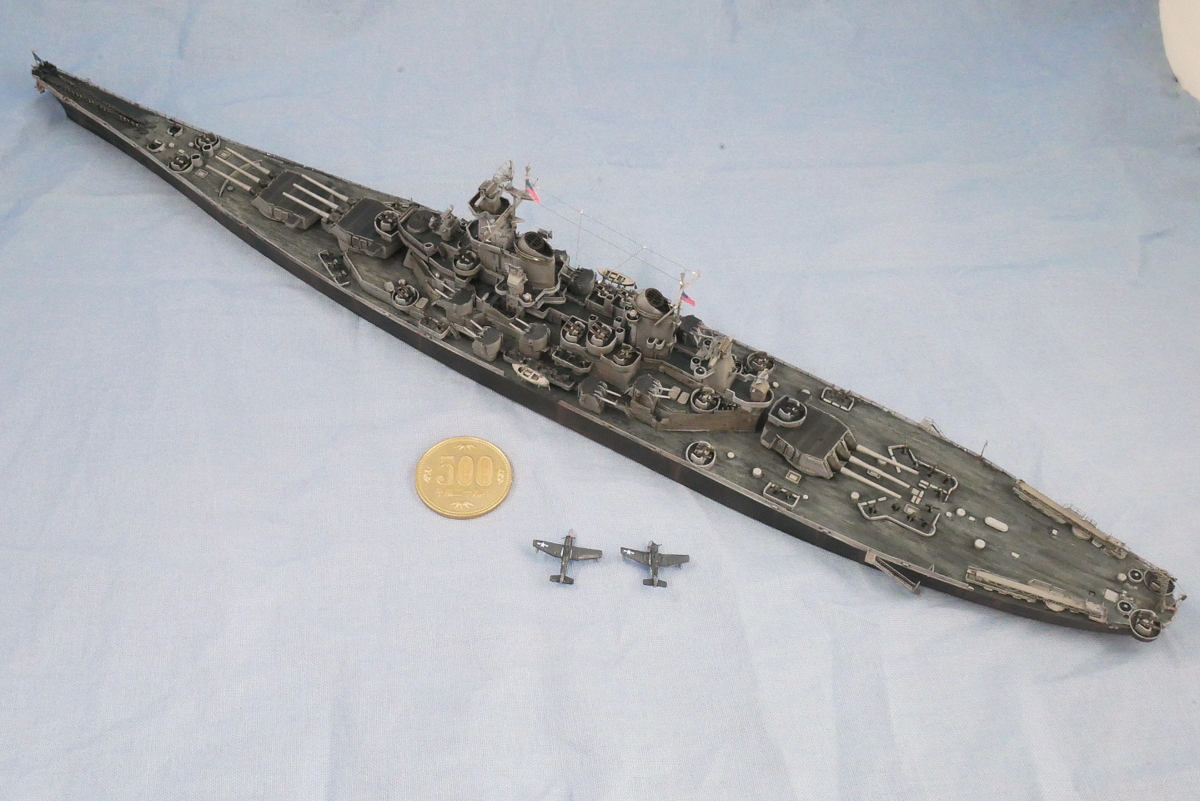
The battleship Missouri was built as an Iowa-class battleship, following the battleship Iowa and the second, New Jersey, as the third this Missouri. The total length is 270 m, which is quite long, but the full width is 33 m, so it looks slender. It was built to be relatively narrow, so the Panama Canal could go back and forth between the Pacific and the Atlantic. I made battleship Yamato and battleship Musashi before, so I was surprised at their slenderness when I compared them.

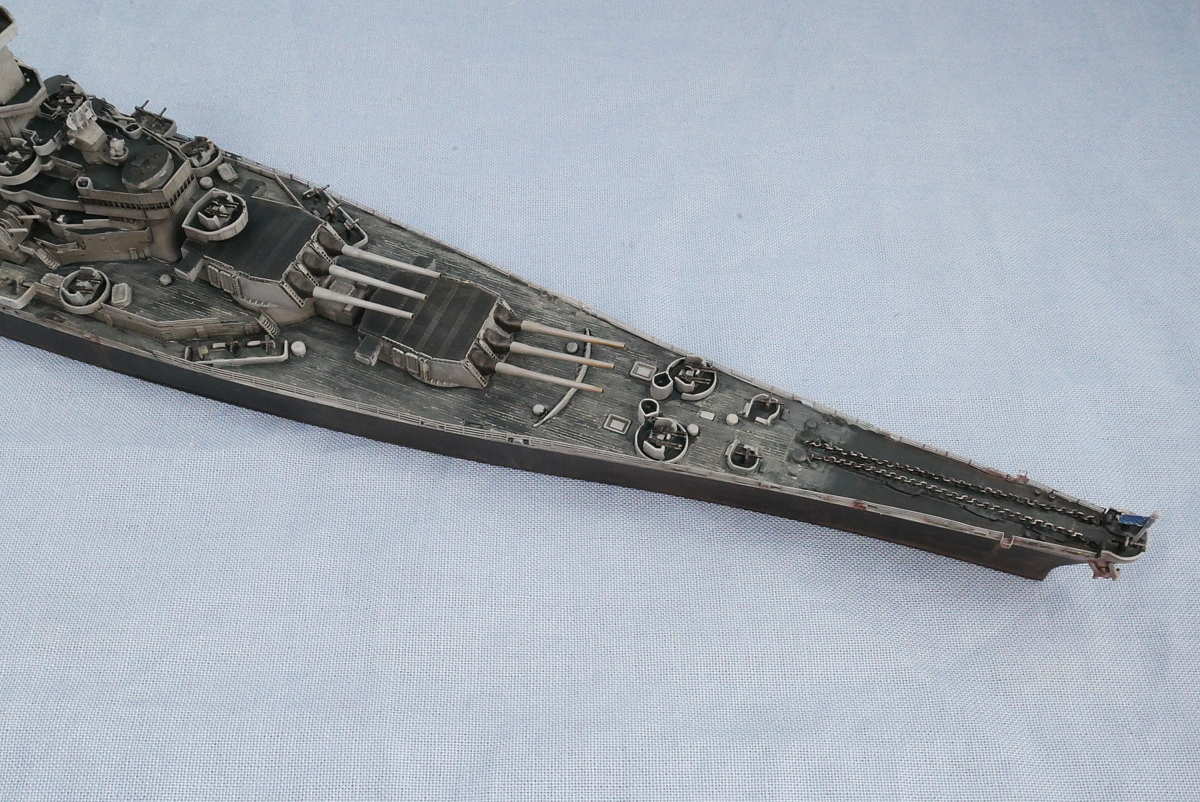
The main gun is mounted with three triple-barreled turrets of 50 calibers 40.6cm guns, and the secondary guns are mounted with ten turrets of 38 calibers 12.7cm. It is also equipped with 40 mm 4 serial anti-aircraft guns and 20 mm anti-aircraft guns. After that, a stronger Montana-class battleship was planned, but this Iowa-class battleship was the last because the main battle force was transferred to an aircraft carrier.


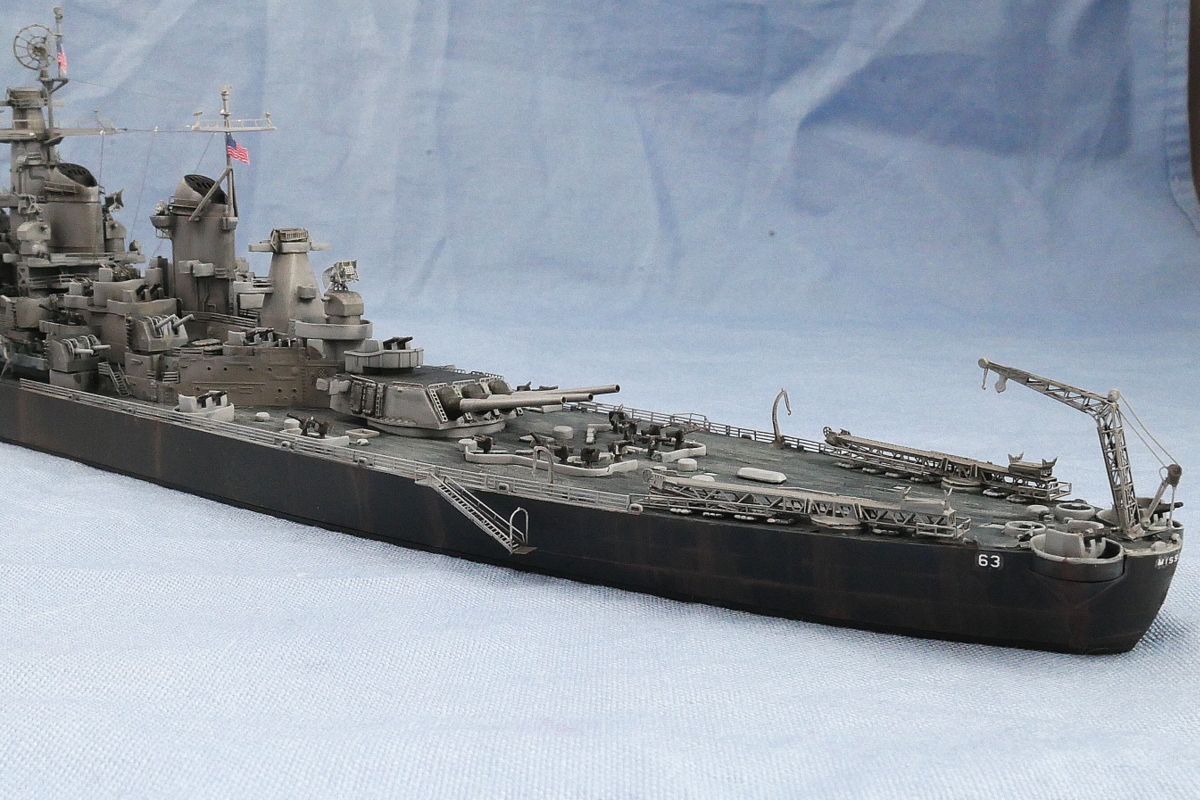
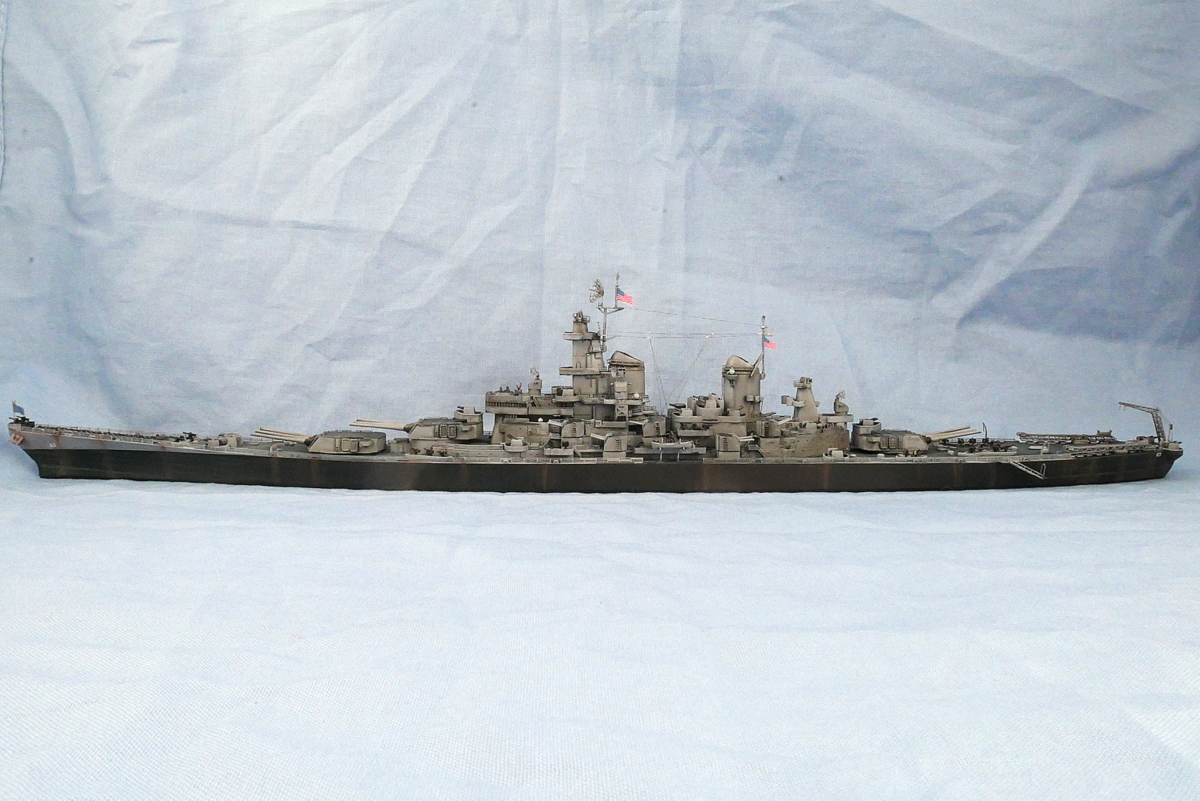
Missouri participated in naval artillery operations during the Iwo Jima landings and naval artillery operations in Japan’s coastal industrial areas. It is famous that the signing ceremony of the document of surrender which Japan surrendered was held on the deck of this BB-63 Missouri.
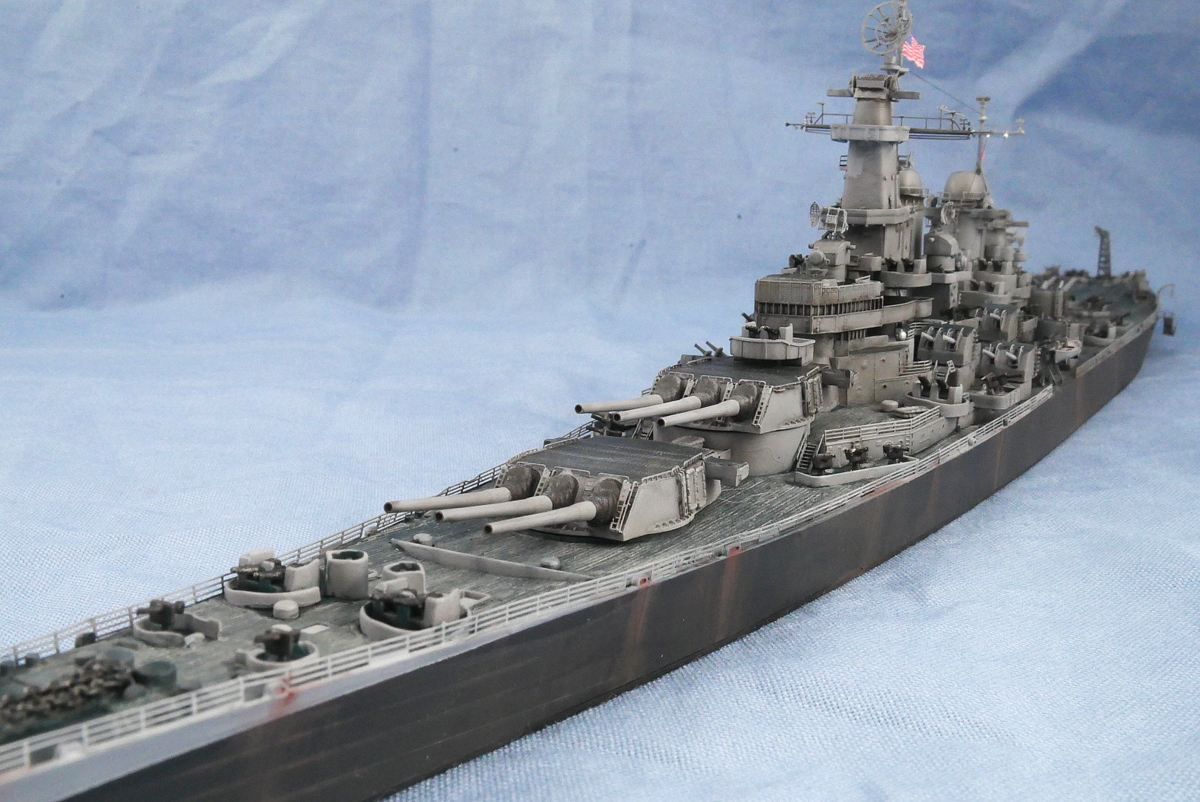

It was hard to paint the parts parallel to the sea surface dark blue and the vertical parts light gray. Even when painting with a brush, the only way to do it is to repeat it several times to reduce the sticking out gradually. Oh, I’m tired.
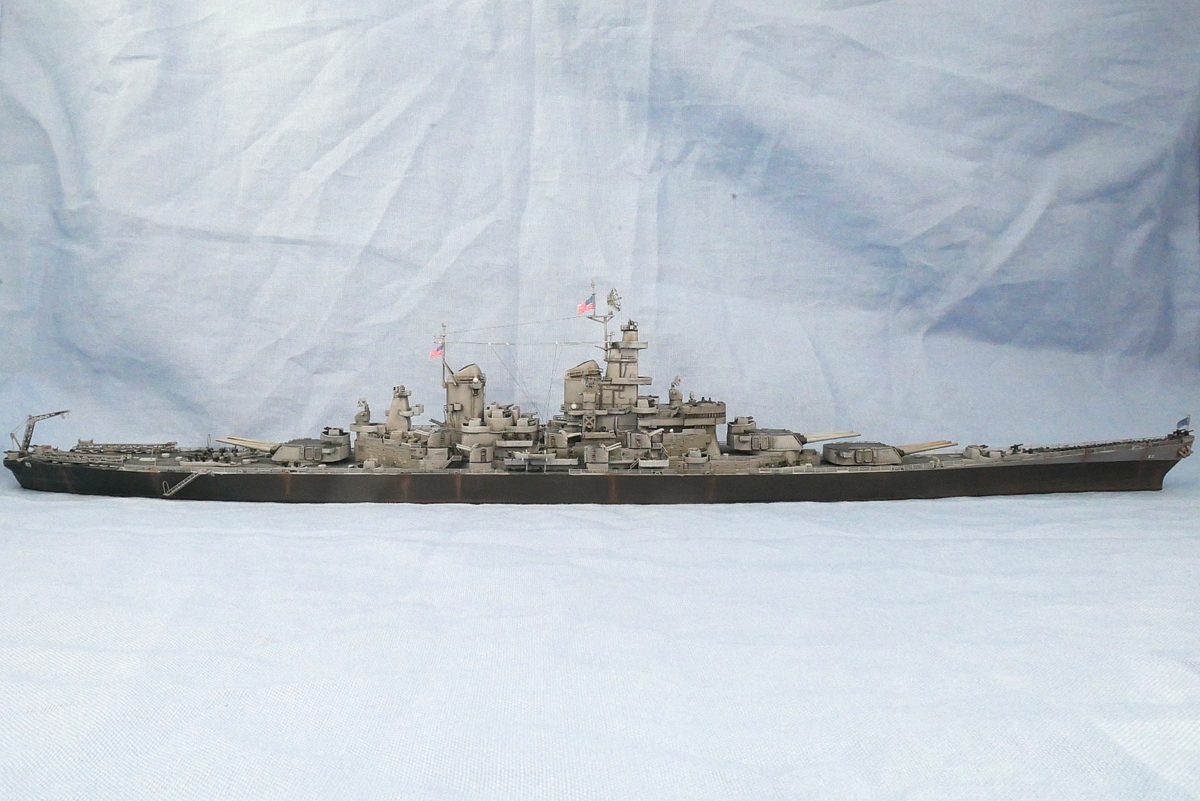
The starboard and port sides of the battleship Missouri are monotonous if it’s only dark blue, so I painted them a little rusty. It’s more like a model performance.

Does the antenna of a U.S. warship not stretch so much? Looking at various examples and Tamiya’s box painting, it seems better not to be too persistent. This time, I made it a little around the bridge.
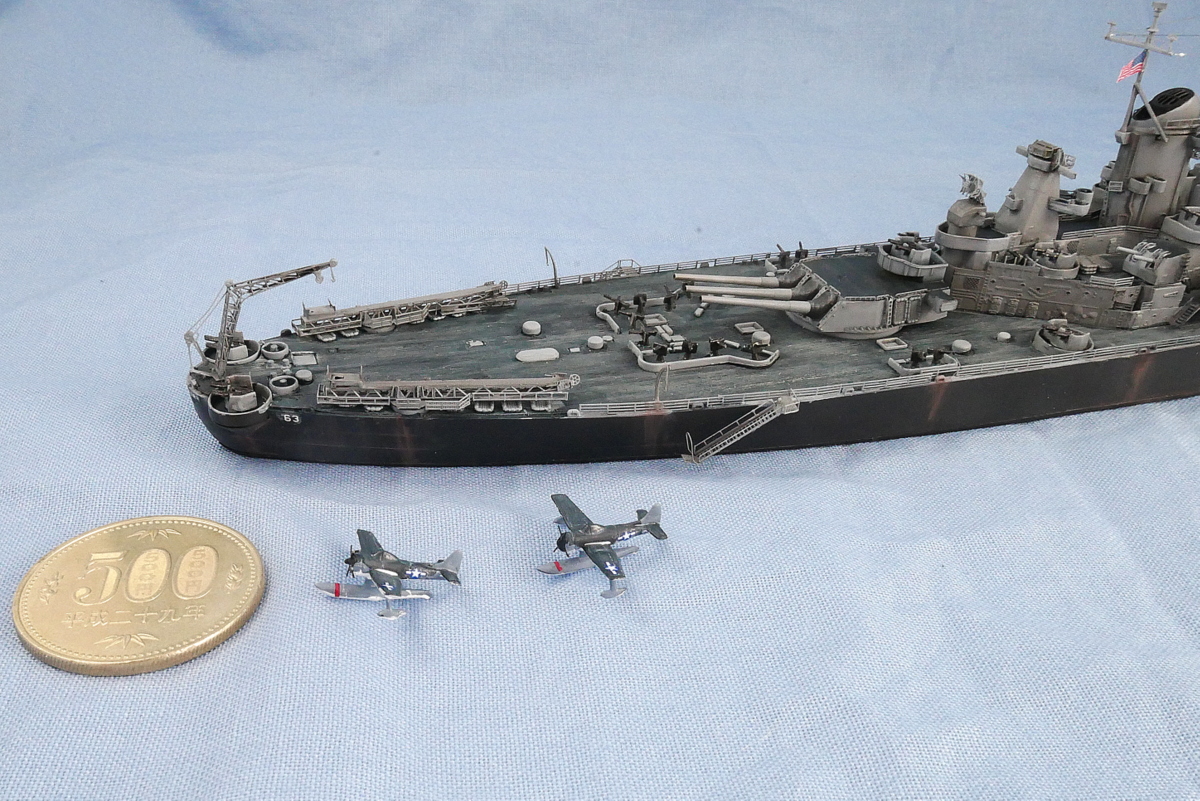

It is the lower side of the Curtiss SC-1 Seahawk. With a nationality mark, even 1/700 looks nice.

Creos lacquer sometimes has a glossy color, so I felt unnatural during painting. When I finished it with a matte finish at the end, it looked much more natural.
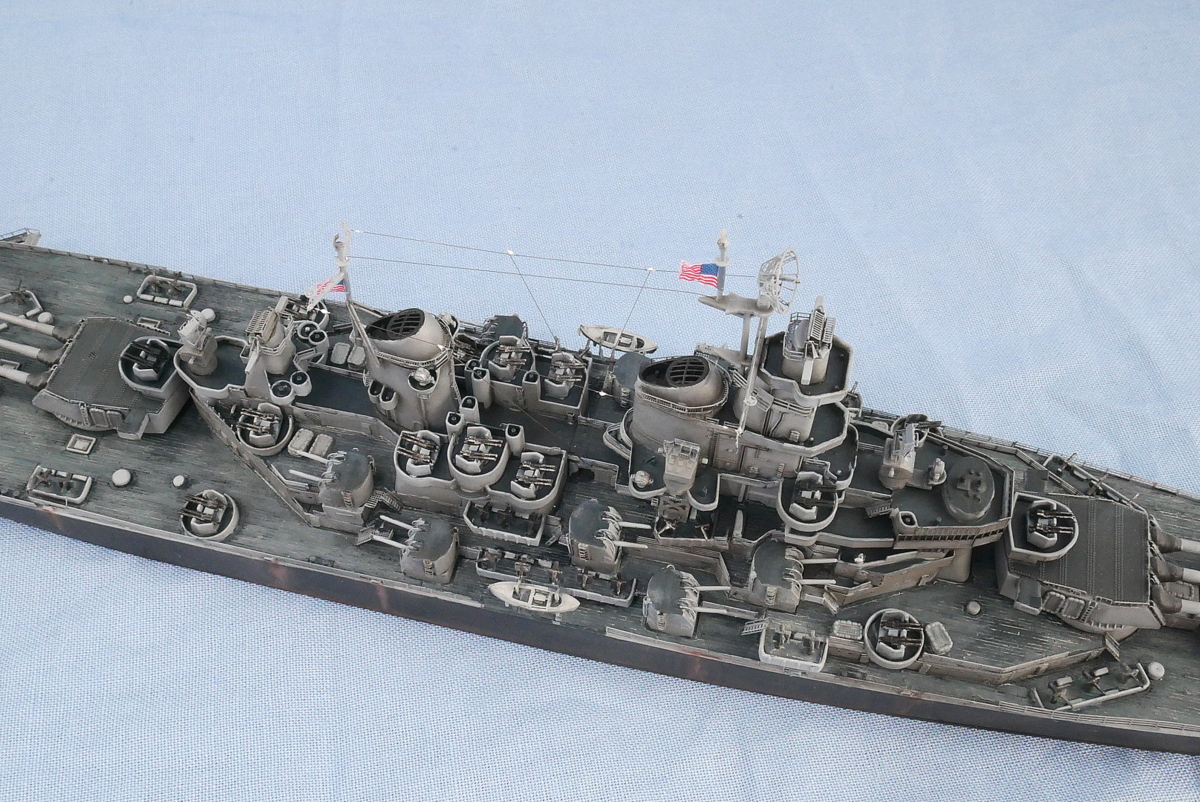

Etched parts, such as the rear crane, are challenging to assemble, but many parts have good details, so it was worth the effort.
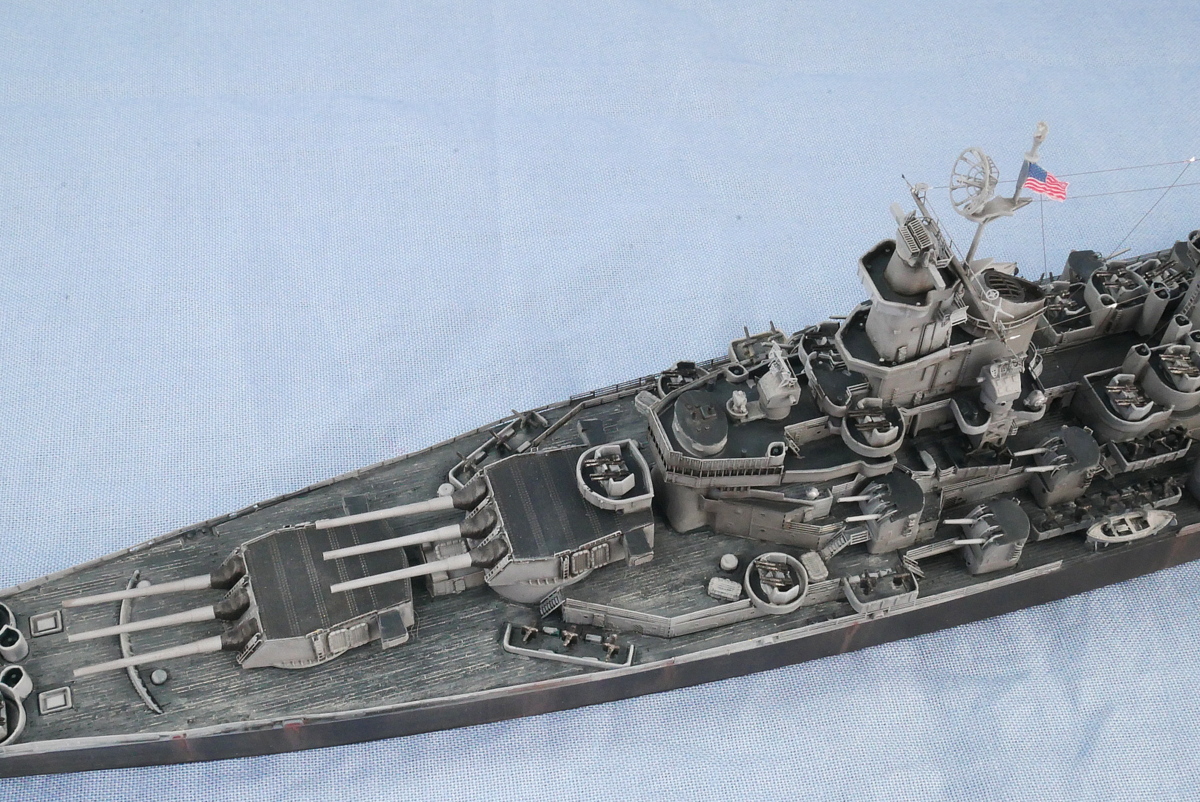
The deck color is dark blue-green, so I thought it wouldn’t be fun if it were a single color, so I washed it with a slightly lighter color, but it might have been too much. But we may understand that this is a wooden deck.


It was the first time a warship other than the Japanese Imperial Navy was built properly. I don’t have many foreign warships in stock, but I will try again if I have a chance. If the basic color of the ship is different, the atmosphere will change a lot.
(2022/05/31)
 Ausf. E/F Tristar 1/35")

コメント