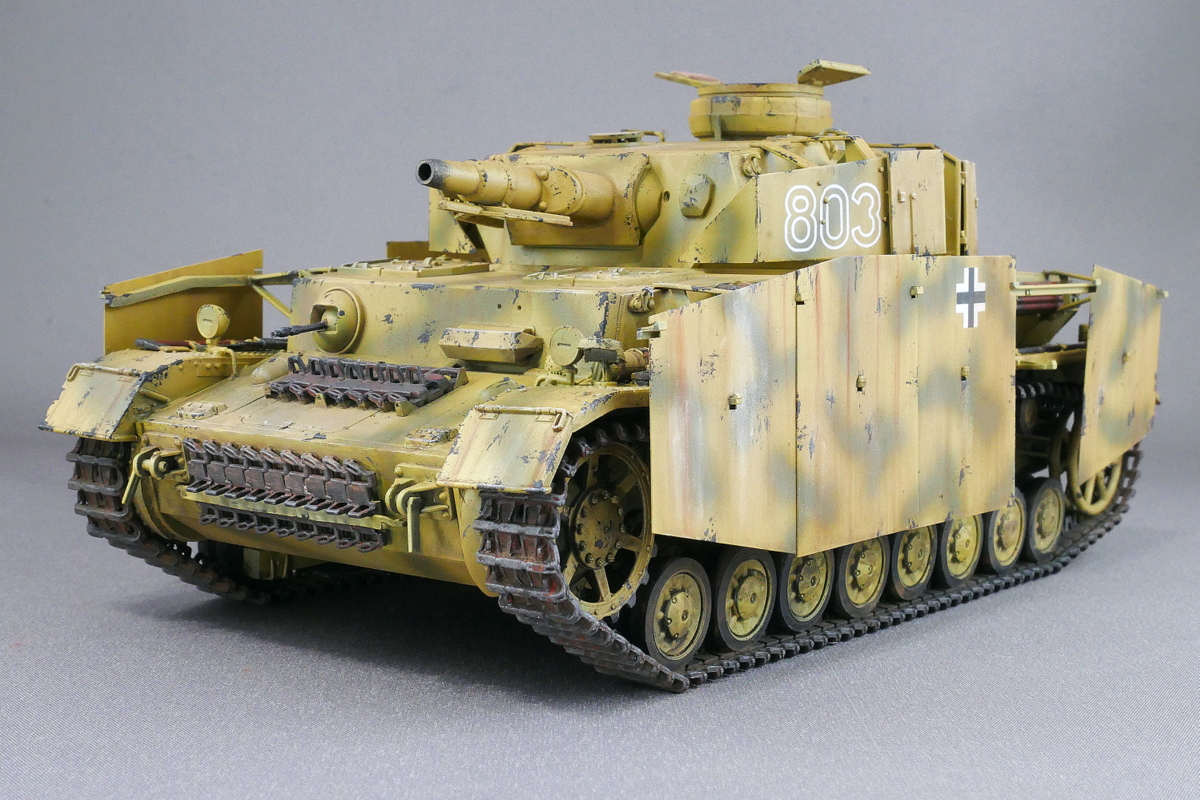
ボーダーモデルのIV号戦車F1型を製作しようと思います。数年前にボーダーモデルのIV号戦車のキットを3つまとめて購入していたのでそろそろ1つくらい積みを崩してみようかなーということです。タミヤが大好きなのでここはタミヤのキットを買うべきと後で気付いてちょっと後悔してます。同じようなキットをいくつも積んでおくのも何なのでストックが少し捌けてからタミヤも作りたい。ちなみに短砲身型をF1型、長砲身型をF2と区別されています。

ボーダーモデルのIV号F1のキットだと通常の砲塔に加えてお好みで砲塔周りに増加装甲を施したタイプや、車体の左右にシュルツェンを取り付けたタイプの車両を選べるのでタミヤと違う車両ということでこの辺の追加ができればと思います。ボーダーモデルのキットの箱には”Vorpanzer”と書いてあり増加装甲を施したIV号戦車がこう呼ばれているとのこと。Vorpanzerというタイプは防盾から砲塔横ハッチの前くらいを囲っていることが特徴ですかね。3タイプ選べるのってものすごく迷います。このキットだけで複数個買っておけばよかったですね。車両の下側のモールドも細かく施されているようです。

IV号戦車系列のたくさんある転輪、部品レイアウトが結構考えられていてパーティングラインが転輪の中央に出ないようにランナーの構成されています。ゲート部分だけやすり掛けすればよいのでたくさんある割には部品整形が楽です。

グリルの空気取り入れ口カバー、過去に何度もIV号戦車系を製作しているにもかかわらずいまいち構造とか解らなくてうまく作れたためしがなかったんだけど、このボーダーのキットが一番作り易かったです。
WBCの決勝も凄かったですね!大谷は最後の最後まで漫画の世界を現実化しますな。打者として全力プレイのあとに泥だらけのまま最終回に投手としてマウンドへ。しかも最後の打者はチームメイトでスーパースターのトラウトですよね。これが運命でなくてなんなのでしょうか。そして160キロストレートからの完璧なスライダーでの空振り三振で試合終了。全試合通じてメンバーも最高なら試合展開も最高で語り継がれていくのでしょう。普段野球は全然観ませんが久々に感動しました。あと、全く関係ないんだけどキッシーのウクライナへの最重要支援物資はうまい棒なのかな・・・。それともうまい棒に見せかけた新兵器だったりしてね。
(2023/03/23)

フェンダー部分のOVMを取り付けてあとから車両と合わせる組み方を採用しているキットがけっこう多いですね。クランプ類のモールドが細かいのでエッチングパーツに置き換えなくても良い感じです。

細かい部品の組み立てよりも大きい部品のほうが合わせるのが難しい。初めて作るメーカーなのでいまいち要領が分からないからかもしれません。フェンダーと横の装甲の間にちょっとスキマができてしまったところがありパテで埋めたりしました。フェンダーはなるべく地面と平行になるように調整したほうが良いです。傾いていてもバトルダメージっぽいけど平行が出ているほうが格好良いと思う。

大きな問題もなく車体部分の組み立てがだいたい完了しました。結構組み立て易いです。一時期のキットではIV号戦車の転輪周りの部品がめちゃくちゃ細かい部品で構成されていて組むのがしんどいキットもありました。このキットは適度なパーツ分割で楽しく組めています。

今回の部分連結履帯のパーツです。だいぶコマ数に余裕がありそうで予備履帯を組んだ後でもだいぶあまりそうです。

III号戦車やIV号戦車系列の履帯はいつも向きを間違えそうになるのでいろいろ確認しながら進めようと思います。
京都のタリウム毒殺容疑の事件、やはり今回の事件が初めてではなかったみたいだ。他にも周囲の不審死を調べるとでてきそう。この薬品は昔は普通に店で入手することができてたからその在庫を持ってたのかね。前例で成功してしまった為に安易に手が出る状況だったという感もまたなんとも。土地持ちお金持ちではあるんだけど、当初イメージしてた旧家でのんびり育ったボンボンではなさそう。2020年から急に羽振りが良くなったらしいけど叔母さんの事があった後で会社の経営を握ったからそうなったのか、あるいは先に羽振りが良くなって叔母さんに窘められて鬱陶しいから害したのか。どちらにしても身勝手な犯行だ。確か父親も急死じゃなかったっけ?こうなると実の父親まで毒殺の疑惑も深まるね。
(2023/03/25)

試しに片側を組んでみました。なぜかいつも左側から組み始めて、次に右側を組み立てるので右側のほうが上手く組めたりもします。今回は両方とも上手くいきそうです。ボーダーモデルの部分連結履帯の組み立てはとてもスムースに行えました。部品の合いも良いし細かいモールドも秀逸です。他の現用戦車キットではものすごくたくさんパーツを構成する履帯がありますが、こういうのも精密さと組み立て易さを両立させたパーツ構成になればなぁと思います。

両側の履帯を無事に巻くことができました。接着剤が乾燥するまで履帯と車体の間にティッシュを挟んでいたら一緒にくっついちゃったものがありました。色を塗れば泥汚れ表現の一環に見えないこともない。

シャーシの転輪シャフトの裏側のボルトらしき部品がランナーに付いていました。これを貼り付けろとな。

シュルツェンのこの真鍮色がけばけばしくてあんまり好きになれません。でも薄い鉄板の感じがちゃんと出ているので優れていると思います。
テレビのスッキリで問題になっているペンギン池にタレントが落ちた映像を見てみました。そもそも今時タレントが池に落ちるの見て面白いですかね?お約束過ぎて時代遅れのネタにしか見えないですよ。こりゃペンギンが死んでいたりしたら間違いなく社長の辞任に発展してたね。そもそもこういう映像って社会問題となった回転寿司の下劣な非常識動画と同じ発想に感じます。動物園から抗議が入らなかったらアホなことやってるなぁって思うだけでペンギンたちのことは考えなかったかもしれない。言われてみてペンギンは繊細なので飼育するの大変なんだと気づきました。コミック、「バケツでごはん」でもみんな繊細なキャラだったし。あのコミック好きで10回以上繰り返し読んでます。
(2023/03/28)

ボーダーモデル IV号戦車F1型、砲塔の天板に溶接跡と段差が有るパーツは間違いで、段差無しのスムースなほうが正解らしい。手元に無いからわからないけれどタミヤのIV号も段差無しになっているようです。私がゲットしたキットは運悪く初期ロットなのか段差有りの間違いらしい・・・。言われないと気付かなかったんだけどね。代理店などに連絡すれば替わりのパーツをもらえたとか違うとか海外の掲示板ではいろいろ言われていました。自分はあんまり気にならないのでこのままでいいかな。今回はあまり見なかったシュルツェンをフル装備の車両を組む計画なので、製造期間の終わりのほうで砲塔上面が段差アリの車両もあったりして。そういえば大昔にドラのエレファントのキャタピラのすべり止めのハの字モールドが逆とか、トライスターのIV号戦車フェンダーのモールドがドット状でまかりならん!とかいろいろあった。私はあまり詳しくないんだけど正確なキットを組んでいるほうが気分は良い。ましてや組む前からこのパーツ違ってるよとか言われるとモチベが・・・。箱絵は格好良いねってフォローになってないか。

砲塔の部品番号の指定が一部違っています。ちょっと焦りました。

フィギュアを乗せようと思っているので片側だけハッチを開状態としました。そろそろフィギュアを合わせてみましょうかね。

転輪シャフトの裏側の細かいパーツを取り付けました。まぁ正直なところこういう部分は誰も見ないんですけどね。一応は自己満足。

シュルツェンを取り付けるとサイドハッチを開状態にするといろいろ干渉してややこしいです。この辺は各部を調整しながら一気に製作したほうがトラブルが少ないように思います。フィギュアを絡めようとするとハッチの開き具合とかシュルツェンに干渉していつの間にかシュルツェンの角度がゆがんだりとか意外と大変でした。
ウクライナ戦争では最近はバフムトの話題ばかりなのは戦線が膠着してるんでしょうかね。その間に西側供給の戦車配備が進んでいくのでロシアやばそうです。数十両程度のNATO供与の戦車でもバフムト周辺のロシア軍を一掃するには十分な数なのだろうか。全土奪還にはもっと数が必要だろうけど。ネットではウクライナ応援動画がたくさんあって、ロシア軍が攻撃したがウクライナ軍が撃退しましたってのも数日経つと戦況マップでロシア軍占領地が拡大してることもある。ロシア応援する気は無いけど、ロシア人が何人死んだと言ってはしゃいでるのを見るのもちょっと気持ち悪い。まぁ戦車模型作ってて何言ってんだという感はありますが。
(2023/04/02)

だいたいの組み立ては完了しました。シュルツェンは塗装のことも考えて固定していません。金属製の大きなパーツなので、あとでメタルプライマーを吹いてから基本塗装ですかね。

うん、いいですね。とても格好良いと思います。シュルツェンによる特徴的な外見が好きです。

何か足りないと思ったら牽引ロープを工作するの忘れていました。そういえばおまけにバケツやらジェリカンもキットに付属していたなー。あとで一通り作ってみます。

だいぶ暖かくなってきたので塗装もしやすいですね。でも最近では黄砂が吹いてくるらしいので窓開けっぱなしはリスクかもしれません。スギ花粉はそろそろ終わりかな。薬を飲むの止めてもくしゃみが出るようならまだもう少しだろうけどまだ怖くて試してないです。

キット付属のバケツやジェリカンです。ドイツ戦車兵フィギュアのキットにも少しジェリカンが付属していました。
ちょっと前に大阪平野区で男が80代の女性の頭に金属製の杭を突き刺したって怖いニュースがありました。杭ってなんぞ?…彼岸島?バンパイアハンターかよっ。町内だから顔見知りだろうか。通り魔よりは怨恨の方が動機としてはマシだがそれにしても怖い事件だ。彼岸島ってコミック、10年くらい前に読んだけど結局はラスボス戦を最終巻33巻まで引き延ばしてそれでも完結しなかったんだよなぁ。最初はパニックホラーだったのにいつの間にかバトルアクションになってた。あの漫画では吸血鬼に血を吸われると全てのシーンで体が弛緩して失禁するところが描かれるのが面白かった。作者のこだわりが感じられます。
(2023/04/13)

最近は気候が良いので出歩いてばかりであんまり模型は進みませんでしたが、一応塗装に入りました。シュルツェンが大きなパーツで丸ごと金属板なのでメタルプライマーを吹きました。ミッチャクロンを缶でキープしてあるので今後そちらに移行したくて早くクレオスのメタルプライマーを使い切りたいのですが、ちょっとエアブラシで吹いてもなかなか減りませんね。

今回は特にグラデーション塗装のつもりもないので不要かと思いましたがブラックで下塗りしました。細かい部分がけっこう多いのでシャドウ効果があるかも。あとハッチが開いている部分があるので一応内部を黒く塗装しておきました。本来は内部は白だけどフィギュアを配置するので中はほとんど見えないと思う。
このあいだネットでAI技術で製作した架空のグラビアアイドル画像を見たらリアルすぎてビビりました。製作時間は数十秒だそうです。自分が見た画像は人物が完璧すぎる容姿でかえって違和感があるけど、容姿の一部にちょっとだけ欠点を持たせてよりリアルな個性を表現させれば動かすことも歌わせることもできて、もう実在のアイドルとか要らなくなりそうなほどです。変に入れ込んだファンが事件起こすことも無いだろうし、いつまで経っても年取らないから卒業もしないんだろうな。V Tuberと似たような感じなのだろうか。まぁ、実際のグラビア写真も凄まじい画像加工技術が施されてるだろうから虚像なのはどちらも同じか。オリジナルが存在するかどうかで価値が変わるのかもしれない。
(2023/04/17)

ダークイエローのストックがたくさんあると思っていたら、Mr.カラーの39番は手持ちがほとんど無くて塗装の途中で切れてしまいました。タミヤのダークイエローがあったのでクレオスと調合して適当に好みの色調にしながら塗装しました。クレオスの水性みたいにあまり白っぽいのも好みじゃないし、かと言って濃すぎるのもなぁ。難しいです。今度はガイアカラーのダークイエローを使ってみよう。当時の色を正確に再現したと記載があったし。

迷彩で使用するダークグリーンがこのキットだと色指定でmigのしかないですね。近似色を調べたらクレオスだとカーキとあったんだけどこれだとちょっとおかしくないかな。結局はカーキとカーキグリーンを調合したものを吹いてみました。

それで久々にクレオスのMr.カラーを買おうとしたら凄く値上がりしていてびっくりしました。やはりここまでインフレの波が押し寄せてきているのか。プラモデル製作は道具をそろえるのにある程度お金が掛かるけど、しばらく経つとそれほど追加の道具に関する出費は必要なくなります。ただし塗料や消耗品はときどき買い足したりするのでこればかりは致し方ない。特に塗料は多少値上がりしても塗らないと完成しないですからね。次回の塗装用にガイアカラーをストックしました。今回はクレオスとタミヤの調合ですが。ドイツ戦車はちょくちょく作るでしょうからおそらく無駄になることはないかと。
何だか価格の話にばかりなって恐縮ですが、ソーセージのシャウエッセンが値上げ幅がエグすぎて棚から消えたというニュースがあって、地元スーパーで見たら確かにスペースが以前の五分の一くらいになってました。雪印の6Pチーズもだいぶ前から売り場相当減ってますね。PBの倍以上で売ってるからあまり買う人いなさそうです。コンビニやスーパーでも高い雪印の牛乳は余って賞味期限切れで回収されていて売れてない。逆に無名の牛乳が何倍も売れて在庫切れまででる始末。明治とかもそうだけど金額に見合わないものを作って大量に破棄するのもなんだかなぁ。結局は客の懐具合との兼ね合いで必需品以外は購入を減らしてるんだろう。チーズは好きなのであまり高くされると困るな。自分の家じゃ牛もヤギも買えないしねぇ。
(2023/04/23)

製作中のIV号戦車が完成しました。シュルツェンを付けるのと付けないのでは随分と印象が違うのでいろいろ写真を撮ってみました。

ちなみにシュルツェンとは小火器や対戦車銃、成形炸薬弾の攻撃から側面装甲やハッチを防御する外装式の補助装甲板です。1943年4月から標準装備となったとのことです。ツィンメリットコーティングをするしないの問題もありますが今回は無くていいかなー。1943年8月から1944年9月がコーティングが正式化された時期だったと思います。


デカールは薄くてとても品質が良いです。少しマークソフターを馴染ませればすぐに車両にフィットします。ボーダーモデルのインストには部隊名などは記載されていませんでした。たぶん東部戦線のどこかなのでしょう。


シュルツェンを1枚欠いた状態で装備してみました。薄い金属板なのでプライマー塗装後に通常塗装しましたが、それでもあまりガチャガチャと着脱しているとフィットさせる穴の周囲の塗装が剥げてしまいます。


ボーダーモデルのキットにはバケツがおまけで2つ付いていたので1個ぶら下げてみました。


これくらいのシュルツェンの装備具合がランダムさがあって一番見栄えが良さそうです。


最近ドイツ戦車あまり作ってなかったけど意外と塗り分けるパーツが多いです。転輪のゴム部分からそもそも苦行だったりします。だいたいは黒っぽいパーツが多い。


久しぶりにウェザリングでチッピングを施してみたけど少々うるさかったかもしれません。


シュルツェンをフル装備するとこんな感じです。中世の甲冑に身を包んだ騎士みたいですね。


ボーダーモデルのIV号戦車は小さい部品もシャープで合いが良く作り易かったです。塗装指示色がmigだけというのがちょっとあれですが、もうドイツ戦車はたくさん作っているのであんまり考えなくても塗料はチョイスできますしね。とりあえず車両は完成したので塗装中の戦車兵を早く乗せてみたい。
最近はゲームのペルソナ4ばかりプレイしていてあんまり模型が進みません。このゲーム、1月頃にSteamで買ったら自分のビデオカードとの相性でクラッシュ頻発でとてもゲームにならなくて我慢していたんだけど、どうしてもプレイしたくて仕方なく定価で買ってPS5でやってます。我慢は体に毒だからと言い聞かせつつ・・・。最近活躍していないPS5がこんなところで役立つとは。PS2でもプレイしたけどやっぱりこれ面白いね。ゲーム内の雰囲気とか音楽も最高なんですよね。時間が溶けていくのがヤバいです。テレビゲーム全般は時間が溶けるのがホント危険。
(2023/04/25)


コメント
こんにちは、ご無沙汰してます。
ボーダーモデルの四号戦車、私的に未知のメーカーなので製作記が楽しみです。
>タミヤが大好きなのでここはタミヤのキットを買うべきと後で気付いてちょっと後悔してます。
確かタミヤの四号戦車と近い時期の発売でしたよね。
私はタミヤのF型のみ購入してましたが、本製作記を見てボーダーモデルが気になったのでF2型を購入してしまいました(笑)。
砲塔側面のパーツが他メーカーで見かけない分割ですが、より後期の視察孔無しのタイプへの展開が期待できます。
>シュルツェンを取り付けるとサイドハッチを開状態にするといろいろ干渉してややこしいです。
ブログを見てる側からすると実車の構造やメーカーの再現度が分かり有難いです!
ハッチの位置に併せてシュルツェンも観音開きのドアみたいになってて、閉じた状態はかんぬきみたいな物で固定してるんですね。
その昔、タミヤの四号戦車(H型だったかJ型だったか)を作りましたが、そこまで再現はされておらず、またハッチも閉状態で作成したので特に気にせず、実車もシュルツェンの屈折に併せて別パーツになってるだけなのかと思ってました。
>ウクライナ戦争では最近はバフムトの話題ばかりなのは戦線が膠着してるんでしょうかね。
戦線の膠着は降雪~翌年雪解けまでの季節的な理由もあると思うので、地面が固まった後どうなるか気になるところです。
西側主力戦車供与は気になりますよね。
仰る様に数が少ないですし、レオパルト2に加えて、チャレンジャーやM1、更にルクレールやレオパルト1まで供与の話が出てるので、性能のメリットよりも補給や教育が複雑化するデメリットの方が大きい気がします。
先頭に長砲身のレオ2、中盤にM1エイブラムス、両翼に旧東側戦車、更にルクレールやチャレンジャーが追随と言った具合に現代版パンツァーカイルをやるのかと想像するとドリームチーム的な壮観さは有りそうですが。
>全土奪還にはもっと数が必要だろうけど。
全土奪還は米軍が直接ロシア軍を叩かない限り難しいと思います。
湾岸戦争でクウェートからイラク軍を追放するのでも、多国籍軍が質・量の双方で圧倒した正攻法で実現してますし。
あとは日露戦争みたいに戦場での善戦に加えて、ロシア国内で反政府機運が高まる事によるダブルパンチを狙うしか無いかと。
タミヤからレオパルト2A6のウクライナ軍仕様が出てます!
https://www.1999.co.jp/10968123
レオパルト2 A6 `ウクライナ軍`
そうなんですね。ひとつお持ちなんですね。私もあとH型とJ型をストックしているのでそのうち製作したいです。新しいキットなので全体的に作り易くて良いですね。
すごい!タミヤ、攻めてますね。むかしのキットのデカール替えかな。白十字がウクライナ軍なんですね。それにしてもまさか独ソ戦車戦の再来になるとは思いませんでした。ものすごい車種が供給されても整備が追い付かない気もしますが、最後にエイブラムスが供与されればだいぶ押し返せそうですね。
こんばんは、「ボーダーモデル 四号戦車F1型」完成おめでとうございます。
短砲身の四号戦車でシュルツェン装備は珍しい気がします。
シュルツェンに小さい穴が開いてて、取り付け架に引っかけるんですね。
昔作った三突は確か取り付け架への接着だったので、一部外したり完成後も着脱出来るのは良いです。
>それでもあまりガチャガチャと着脱しているとフィットさせる穴の周囲の塗装が剥げてしまいます。
実車も着外ししてれば塗装が剥げてきそうですが、模型だと剥がれ過ぎになりかねないので難しそうです。
>シュルツェンをフル装備するとこんな感じです。中世の甲冑に身を包んだ騎士みたいですね。
同意です。
砲塔のシュルツェンは正面から見ると、何となくダイの大冒険の覇者の冠や、聖闘士クロスの頬の部分みたいです。
こんにちは。シュルツェンは最後までちゃんとハマるか心配だったんですけど、キットの部品がけっこう精密だったのか問題なく組み上がってよかったです。ダイの冒険、懐かしいですねー、途中で読むの止めちゃったんですけど面白かったです。敵としてこの戦車を正面から見るのは勘弁してもらいたいですよね。短砲身のシュルツェン装備って本当にあったんでしょうかね。いちおう写真が残っているみたいですけどそれほど一般的ではないですかね。でも、たまにはレア車両も面白いです。
>シュルツェンは最後までちゃんとハマるか心配だったんですけど、キットの部品がけっこう精密だったのか問題なく組み上がってよかったです。
こんばんは、撮影されてる完成写真みたいに各シュルツェン毎に付け外し出来るのは、流石新しいキットと細密桃源郷さんの腕の組み合わせです!
>敵としてこの戦車を正面から見るのは勘弁してもらいたいですよね。
敵歩兵からすると短砲身75mm砲を装備した信頼性の高い四号戦車は後の猛獣戦車より厄介かもしれません。
逆に味方歩兵にとっては頼もしい存在だと思います。
>短砲身のシュルツェン装備って本当にあったんでしょうかね。
>いちおう写真が残っているみたいですけどそれほど一般的ではないですかね。
砲塔や車体のサイズが後のシュルツェンが通常装備タイプと変わらない四号戦車F1型なら生き残ってれば後付けされてそうです。
戦車不足が常態化してるドイツ軍なら車両の生存性は上げそうです(三号戦車N型にもシュルツェン付があるくらいですので)。
>ダイの冒険、懐かしいですねー、途中で読むの止めちゃったんですけど面白かったです。
連載を延ばさずに綺麗に終わってるので個人的にはおススメの漫画の一つです!
おはようございます。どうもありがとうございます。ドイツ戦車はいろいろ研究が進んでいるのでツィンメリットコーティングの時期やらシュルツェン装備の時期、長砲身に切り替わるタイミングなど本来はいろいろ考慮すべきところがありそうです。時代考証はちょっと面倒な気もしますけどハマると面白そうです。
ダイの冒険、きれいな終わり方なんですね。読んでみようかな。ちょっと前に本そういち氏の「夢幻の軍艦大和」というのを14巻すべて読んだら最後のほうがストーリー酷かったです。タイムスリップもので最後夢落ちみたいな。レビューで散々酷評されていました。でも戦艦や空母の絵がとても上手かったので惜しい作品でした。いきなり連載打ち切りになった感じでしたね。商業誌だから仕方ないとはいえ読者置き去りで最後放り投げられるのは勘弁ですよね。
こんばんは、有名どころ戦車は研究が進んで個体まで特定されてたりしますからね。
そのせいか分かりませんが近年発売されてるタミヤの戦車はマーキングが2~3種類しか無いのが多いです。
タイガーⅠ初期型なんかジャーマングレイやダークイエローの単色、冬季迷彩、二色迷彩、三色迷彩と数種類マーキングと塗装例があって「次は何を作ろうか」なんてワクワクした記憶があるので、考証としては正しくても同一製品を複数売るにはマイナスな気がします。
漫画の連載打ち切りについても同意です。
最近は打ち切りではないにしても連載誌からウェブ移行なんてのもありますね。
そうなんですね、最近のタミヤ、あまりマーキングのバリエーションが無いんですか。あまりたくさんあっても作れるのが1種類だからもったいないなーとも思いますがどれくらいが良いんでしょうね。特に航空機プラモの場合は6種類くらいから選べたら大量に余ること多々あります。